Category: Construction Maintenance Electrician
3 Steps to Starting Your Own Business after Construction School
April 07, 2020
If you are business-minded with an entrepreneurial spirit, you might be considering starting your own business after graduating from a construction program. Business owners can enjoy a flexible schedule, ample learning opportunities, and competitive remuneration.
However, starting a business is far from simple. Even the best construction worker in the world will need to conduct market research, have a basic understanding of finance and accounting, and learn about law and marketing.
Read on to find out more about what it takes to start your own business after construction training.
Step 1: Do Your Research
Before even thinking about launching your own business, you will need to conduct in-depth market research to establish demand and rates. Is there demand for another construction business in your area? How much are people paying on average for typical projects?
If you have any friends or acquaintances working in the industry, make sure to ask them for any insights. You could also do some research online and use social media to identify your main competitors, or even conduct surveys and organize small focus groups.
Use this research to form your business plan and identify your unique selling point (USP). What can you offer customers that no one else can? Is it a better price point? Or expertise in one particular area? Whatever it is, use it to your advantage in a career in construction.

Step 2: Prepare an In-Depth Business Plan for Your Career in Construction
Once you’ve done your research, you’re ready to write your business plan. Make it as detailed as possible,marking out your goals for each month and including estimated annual turnover and gross profits. This will be particularly useful if you need to apply for funding from a financial institution.
This should also give you an idea of how much money you’ll need to get started. After studying at construction school, you should have a good idea of all the tools and equipment you’ll need to work as an independent construction worker.
Calculate how much you’ll need to invest in these, as well as in vehicles, marketing, and software. It can take a while for any new business to start making money, so make sure you have a cushion for the first few months.
You’ll also need to decide who you want to work for. Do you want to work for residential property owners or businesses? Are you looking for small jobs or bigger, long-term projects? As well as this, how many staff will you need to hire? Or will you choose to work with contractors? Thinking about these things early on will help you form a clearer picture in your mind of what your business will look like, and what you need to do to get it off the ground.
Step 3: Check the Paperwork
As with any new business, you will need to make sure that you’ve completed all of the necessary paperwork correctly. You will need to register your business for an EIN, and have all the right licenses and permits. You will also need to get insurance to protect yourself and your business.
If you’re concerned about legalities or taxes, it might be a good idea to hire a lawyer or an accountant. You could be the best construction worker in the world, but if you can’t take care of the administration of your business, it won’t go far!

Do you want to learn more about construction trades?
Contact North American Trade Schools for more information!
4 Things Electrician School Students Should Know About Roughing In Electrical Wiring
February 04, 2020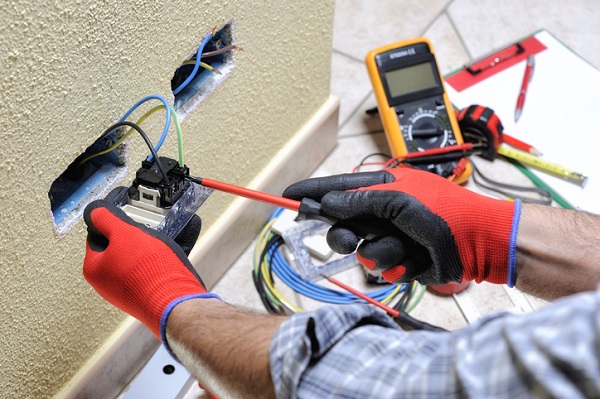
If you want to become an electrician, this is a tool you’ll definitely want under your belt.
Roughing in electrical wiring is something any construction electrician will want to get right, regardless of which part of a house they’re working on. After the framing and initial wiring has been done, you’ll want to make sure the rough-in — the part of the process where the cables are pulled through framing members and studs before going into boxes — is completed before ceilings and walls are closed.
There’s an art to doing it the right way, and any aspiring electrician can do well to keep a few tips in mind. Here are some tips for getting roughing in electrical wiring right if you’re studying to become an electrician.
Before Pulling Wires, Be Sure to Straighten Them Out
Straightening out wires will make the process of pulling cables through holes much easier. To do this, straighten the cable between your forefinger and thumb while you’re walking along its length.
After pulling it through the holes, push it back so that there’s still some slack, just in case the cable gets cut too short and more length is necessary. Also, make sure cable protection plates are installed before pulling anything, and that they are drilled close to the edge of a stud. They will need to be set back at least 1 to 1 ¼ inches away from the edge of a wood-framing part.

Picking the Right Electrical Box Will Go a Long Way
During your electrician career in construction, you will have a choice of electrical boxes to use for different projects.The most common ones are made of fiberglass or plastic.
Depending on the size of the wire gauge, they can be used for large appliances, living spaces, bathrooms or kitchens. Plastic boxes are typically less expensive than fiberglass models, although they aren’t as tough.
Be sure to pick a box with a minimum volume of 20 cubic inches. Larger boxes will make the wiring process easier, so you should pick one large in size that is made with the right materials for the project.
If you’re working on a ceiling fan, you’ll need a special type of electrical box attached with a brace, so that it can make the fan more stable and absorb its vibrations.
Make Sure All Holes are Well-Aligned and Straight When Drilling
You’ll want to be sure that holes are straight and symmetrical in height, so that pulling cables is as easy as possible. If they are pulled at varying heights or angles, it can cause cables to snag on sharper edges.
Once ¾ inch holes are pierced into the framing members above the boxes, centre the part on the stud before bracing the drill. Use your thigh to put pressure on it to make drilling the studs easier.
Ensure the holes are consistently kept at the same height, so that you can more easily fish cable through. You’ll be able to pull cables and drill holes once all boxes are nailed correctly.

After Electrician School, Don’t Over-Bend Any Cables
While bending cables, make sure they are not bent at more than a radius of 2½ inches. You can avoid over-bending them if you drill holes at a range of 8 to 12 inches above or below boxes, so that the cable can go upwards or downwards into them.
This is important for students at electrician school to remember, because the conductors and sheathing can be weakened if the cable is bent incorrectly or too sharply, resulting in a fire hazard.
In any case, it’s important to remember that you’ll need to be as gentle as possible when wiring, to avoid damaging the conductors, as they will carry the electricity. Conductors are also vulnerable to stress and fatigue from overbending, or bends that are too sharp.
Want to get your electrician diploma?
Contact North American Trade Schools for more information!
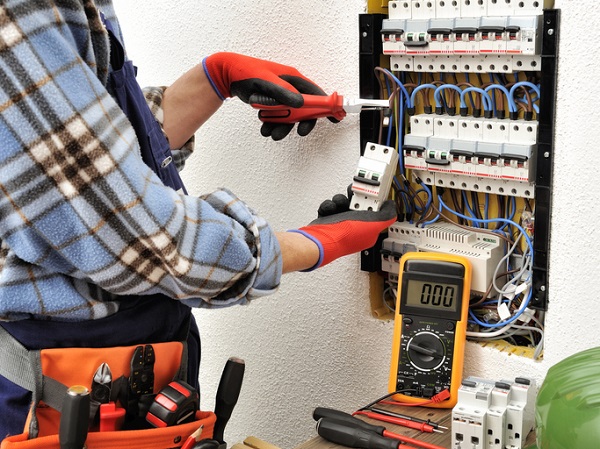
4 Tips for First-Year Apprentices Working Towards Electrician Certification
January 22, 2020
After you complete a pre-apprenticeship program you can seek out an electrician apprenticeship, where you get paid while learning on the job. In Ontario it can take up to five years to complete an apprenticeship during which you will learn the tools of the trade from professionals. An apprenticeship also includes some more time in the classroom and is a necessary step to becoming a licensed electrician.
Before you start your apprenticeship, you may have an idea of what it will be like, but there are a few points that may help you adjust to on-the-job training. Also, depending on which province you apprentice in, there might be loans to buy tools as you start and grants to support you during your classroom hours. In the meantime, here are a few tips to help you during your first year as an apprentice.
1. Ask Questions
While it is true that you are doing a job and you are getting paid, an apprenticeship is still training and it is a great time to ask questions. Professionals know that you are learning to become a maintenance electrician and should be prepared to explain tools and procedures to you. This may be as simple as asking “what’s next?” and “why?” Electricians have experiential and sometimes highly specialized knowledge that goes beyond the classroom. This is why they may have special insight and it is worth asking for as much information as you can get.
2. Record Your Hours
When you are on your way to electrician certification it will be necessary to record your hours and ensure that they are counted toward the completion of your apprenticeship. The same way you will have to keep up to date with electrical codes and regulations as an electrician, you should stay up to date on your progress as an apprentice. Not only is this necessary, it also helps you keep track of how much you’ve learned.

3. Stay Healthy
You will get a sense of the physical demands in the first year of your apprenticeship and many electricians say it is important to stay in good shape. Electrician work can involve a lot of movement, stretching and lifting. You will be able to work longer and better in your career if you are healthy. The first year of your apprenticeship is a great time to work exercise into your routine, and make sure you are having nutritious meals.
4. If You Want to Become a Maintenance Electrician, Take Your Work Seriously
Electricians are highly respected skilled trades people and play an important role in construction and maintenance. When you begin your apprenticeship, remember that you have a big responsibility. It is important to do basic things like show up on time for jobs, but it is also important to remember that you are responsible for maintaining safety standards in whatever setting you work. The more seriously you take your work during the first year, the more you’ll develop good habits in your career that can help you land additional work in the future.
Want to know more about maintenance electrician training?
Visit North American Trade Schools today!
Exterior Wall Components for Electrician Training and Beyond
December 13, 2019
When you study construction maintenance for electricians, you will have the opportunity to apply what you learn in the classroom to hands-on training. This will include working on skill sets for commercial, industrial and residential electricity, analyzing and preparing machine controls, and building an exterior wall, among other things.
Exterior building walls, on first glance, may just appear to be what you see from the outside. When you look at a building you may see materials like brick, cement, siding, or shingles. However, the construction of an exterior wall that is fit for its environment is a complex process that requires a lot of attention to detail and design. Here are a few important points about exterior wall components.
A Brief Introduction to Components for Electrician Training
During your electrician training it will become clear that understanding a building layout and how walls are constructed is important for maintaining electrical systems. The exterior wall assembly in particular helps protect the interior of a building from outside elements. This not only refers to providing shelter for people, but also keeping systems within the building running properly.
Here is a quick introduction to the components of exterior wall assembly:
- Exterior cladding: this layer is chosen based on environmental conditions as well as aesthetics. It is the first, but not most important, defence against weather.
- Air barrier, also known as air paper or house wrap: this is a weather resistant layer that allows moisture to escape.
- Vapour control layer: moisture can build up in the exterior wall assembly without this component so it is typically required by building codes and regulations.
- Insulation: this supports interior temperature control.
- Structural element: this is the load bearing component (or components) that distributes weight and pressure to the structural frame of a building.

Interface Conditions
After you are introduced to the functions of each component of an exterior wall assembly it is important to understand how each component affects the whole. Essentially, the assembly must be able to control and mitigate moisture and protect the interior, including its electrical systems. The ways in which the components of the wall assembly are separated, joined and installed, are referred to as the interface conditions. For example, elements like flashing and end dams prevent excess rain from entering the dry zone of the assembly and may be necessary around windows, or where the wall meets the roof.
Examples of Common Materials
There are many standard materials for exterior wall assemblies that you might be familiar with even before you start maintenance electrician training. For example, Tyvek and Typar are two of the most common polyethylene air barriers. They let water vapour out, but eliminate exterior moisture, thus protecting wiring that may otherwise be vulnerable to moisture. Like tarpaper, another common air barrier, they can be damaged by UV rays.
For the exterior cladding some of the most common materials are cedar shingles, vinyl, cement board, stucco, brick, and a few others. Vinyl or steel siding can be applied directly to air paper. However, if you are using brick or stucco, the interface conditions dictate that a layer of rain screen siding may be required. At the very inside, the most common material is drywall. Overall, your expertise on each of these elements will be required as you work with building plans.

Want to become a maintenance electrician?
Find out how from the North American Trade Schools!
Infographic: 4 Awesome Benefits of Trades Careers
November 20, 2019
Are you thinking about a new career? Whether you’re just out of school or you’re thinking of switching paths, you may want to consider a career in the trades.
Canada is currently facing a shortage of skilled trades people. Despite offering an opportunity to enjoy a high standard of living, trades careers aren’t attracting enough new professionals to meet demand. This is mainly due to outdated stereotypes about “blue collar” jobs, such as them being low-paid or unsatisfying. But forget what you think you know about the trades! Surveys of people in the construction trades, for example, finds that they are happier in their careers than other Canadians.
And pursuing a career in the trades doesn’t mean you have to give up a great pay cheque for the sake of your passion. Trades people also earn impressively high salaries. After finishing electrician training, for example, you could eventually make over $63,000, which is the average salary for electricians in Canada.
Still not convinced that a career in the trades is a great idea? Check out this infographic about 4 awesome benefits of a trades career.

4 Awesome Benefits of Trades Careers
1. Trades Careers Are Hands-On
Not too keen about sitting behind a computer all day?
Trades careers allow you to work with your hands every day
Build things you can be proud of
Tackle new and exciting challenges
Trades careers involve working in a variety of interesting settings
2. Trades Workers Are In Demand
Canada is facing a skilled labour shortage
The construction industry alone will have 44,100 unfilled job vacancies by 2028
Unfilled industrial maintenance jobs are expected to be almost as high
In Ontario, 91,100 construction workers will retire by 2028
Only 77,800 new entrants will be available to replace them
If you want a job that is in extremely high demand, join the trades!
3. Trades Careers Pay Well
Think a career in the trades doesn’t pay well? Think again!
A shortage of trades workers has fueled impressive wage growth
Check out these average Canadian salaries for in-demand trades:
- Electrician: $63,236
- Plumber: $63,345
- HVAC Mechanic: $58,500
- Roofer: $56,550
- Carpenter: $52,296
- Welding: $50,700
In the trades, experience counts:
Experienced trades workers on average make up to $91,163 per year
4. Earn While You Learn
Don’t want to wait through 4 years of schooling before making money?
Pre-apprenticeship programs take less time to complete!
Once you become a trades apprentice, you’ll earn while you learn
Apprentices work under the supervision of a certified tradesperson
There are so many reasons to pursue a career in the trades!
Discover which option would best suit your interests.
Sources:
https://www.ontario.ca/page/start-apprenticeship
What Electrician Diploma Students Should Know About Reading Layouts
October 08, 2019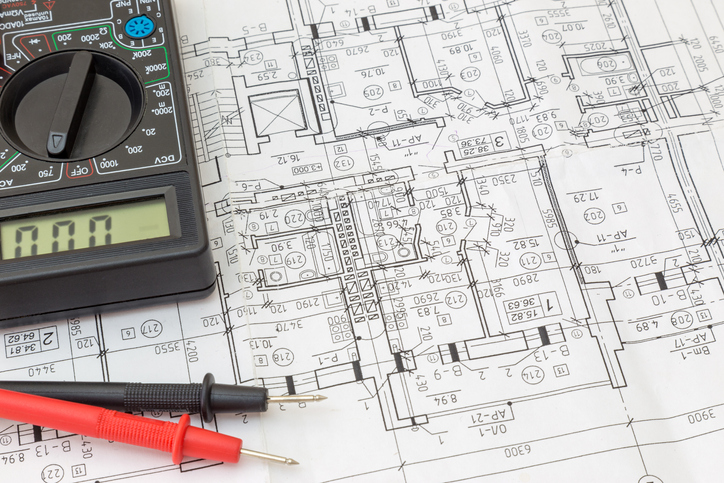
As an electrician (particularly a construction electrician), it’s important to be able to understand how to read electrical blueprints or layouts. With these layouts, you will have a better understanding of how electrical systems are to be built, and where all the various parts (eg. light fixtures, switches, wires) need to go. That said, they can be a bit complicated to look through at first. Luckily, it’s easier to get the hang of than you might think.
Regardless of all the symbols and more specialized aspects you may encounter while reading them, there are ways you can effectively interpret an electrical plan without too much trouble. Here’s what you should know about reading layouts if you’re studying to become an electrician.
Read What’s in the Architectural Layout Before the Electrical One
When you look at the floorplan for the building’s architectural layout first, you’ll get a good sense of how much space you have to work with, where things are, and where electrical parts should logically go. Not only that, but you’ll have information about the layout that isn’t necessarily in the electrical portion of the plan. This can help you identify potential conflicts between the architectural and electrical plans that you may not have noticed by only looking at the electrical plan. Either way, you’re going to need to understand what sort of parameters and space you have to work with, since you’ll have to work within them to make sure all the wires are in the right place and able to deliver power throughout the building in ways that are safe for everyone and compliant with bylaws and regulations.
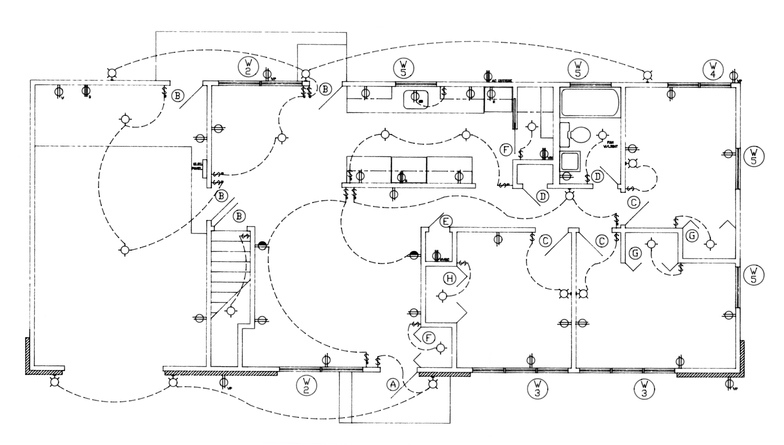
Familiarize Yourself With the Wiring Diagrams and Symbol Legend Before Getting Started
In many electrical layouts, there will be symbols representing various parts, and it’s important to study the symbol legend before you start working. Once you understand the symbols legend, you’ll be able to work faster and more efficiently. The legend will help you understand what the symbols are, what they mean, and where various components need to be. The plans for the project’s electrical components will also likely show diagrams of the paths the wires will take between the different pieces of equipment—important to keep in mind since you will be learning about residential wiring in your maintenance electrician training. This will show you the breakers running each wire, as well as which items within the house (eg. lights) are grouped or phased together onto one breaker.

Your Electrician Training Will Help You to Read Blueprints
All instructions of the electrical layout have to be followed exactly as written—or drawn—and sometimes the information presented can be overwhelming and will require specialized knowledge on electrical components. For example, you’ll need to understand how power across lines will be distributed, as well as the circuit’s flow and critical points where separate wires connect. It sounds like a lot to take in, but it is important information to remember so that the job is done effectively and so that fire, sparks or other hazards can be avoided. Fortunately, in electrician training you will learn how to read blueprints and building layouts, as well as the fundamental principles of electricity. At the end of the day, no part of the layout can be misinterpreted or ignored, and learning about plans and layouts will help you become a better electrician.
Want to get your electrician diploma?
Contact North American Trade Schools to find out more!
What to Know About Conduit Bending for Your Career After Electrician College
September 12, 2019
Conduit bending is an essential skill electricians learn during their training. Various materials from rigid steel to EMT (electrical metallic tubing) will call for bending at some point or another. If you’re studying to become an electrician, there are numerous reasons why this is an important skill to have under your belt.
While you’ll be taught about conduit bending during your courses, it’s good to have some idea of what it is beforehand. Here’s what students in electrician college need to know about conduit bending.
There Are At Least Four Different Ways You Can Bend It
With regards to conduit bending, there are several methods you can choose to get the job done. Among them are the 90º (also known as the “stub up” bend), back to back, offset, and the saddle bend. The stub-up bend is where one end of the conduit is bent upward into a 90º L shape. Back to back bends are where parallel stub-up bends are made to a 90º angle on both sides, making a U shape.
An offset bend is where a shift is made somewhere along the conduit even though the bend continues to run parallel to where it was initially. Lastly, the saddle bend is where one portion of the conduit is bent at 45º over an obstacle before returning to its original plane. You’ll learn to develop your conduit bending skills during maintenance electrician training.

Bending Conduit Involves a Lot of Marking
After you’ve undergone the first step of selecting the proper bender and removing cutting burrs if necessary, you’ll need to mark the points on the conduit for bending it properly. You’ll then need to decide where the conduit should start, the necessary length of the bend, and where you need it to change direction. Then, you’ll need to mark the bend’s midway point before measuring to make sure those marks will bend correctly, and then mark another line on the floor.
In other words, make sure you buy yourself a Sharpie if you want to be an electrician! However, if your bend is for exposed work like in factories, use a pencil instead to prevent the ink from bleeding through after the conduit is painted.
You’ll Want a Good Bender After Electrician College, But it’s Not the Only Tool You’ll Need
Whether it’s made of steel or aluminum, it should go without saying that having a good bender to use after getting your electrician diploma is important. However, aluminum ones are preferred over steel, as the latter type is a lot heavier. It’s also very useful for newer electricians to have a handle as well as multiplier markings on the bender, to streamline the calculation process.

While a bender is easily the most essential tool you’ll need here, it’s not the only one. You will need a strong, high-quality level, and ideally one with rare-earth magnets and levels attached to them. Additionally, you will do well to have a tape measure and a framing square on hand, as both will be key in helping ensure you get the correct angles and measurements for the bend.
Do you want to study at an electrician college?
Contact North American Trade Schools to find out more about our programs!
3 Environments You Might Be Working in After Electrician School
September 09, 2019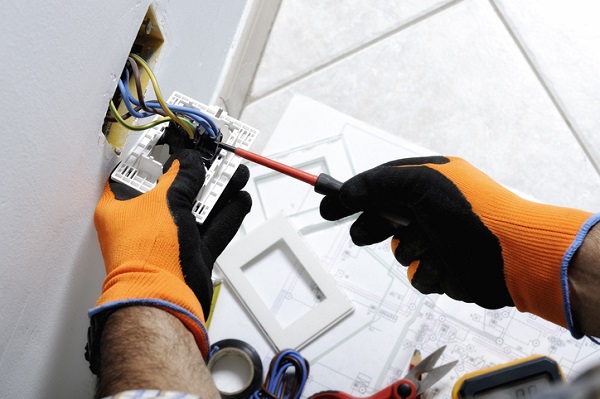
If you’re about to begin a career as an electrician, there are numerous possibilities for where you might work. You could ply your trade in homes, office buildings, construction sites, or industrial factories. Whether you want to work indoors or outdoors, travelling or just at one site, there’s an electrician job for you.
Wherever you end up going, your job remains to ensure electricity safely goes straight from the source to those who need it the most. Here are three places you might find yourself working in after completing your program to become an electrician.
1. You Could Find Yourself Working in People’s Homes After Electrician School
Residential electricians work on wiring and lighting in people’s homes and apartment buildings, among other living spaces. In this career, you could find yourself going to different homes, carrying out the necessary tasks to make sure residential buildings and units have electricity in place, and installing it both indoors and outdoors as necessary.
Your tasks could include determining where equipment and fixtures will be located in the home, working on security and air conditioning systems, and ensuring electricity can travel from the source to the home’s circuit breaker. Whether you’re working on an existing home, or one that’s still being constructed or undergoing renovations, you’ll be able to work on electrical wiring and fuses to keep tenants and families happy and their homes running smoothly.

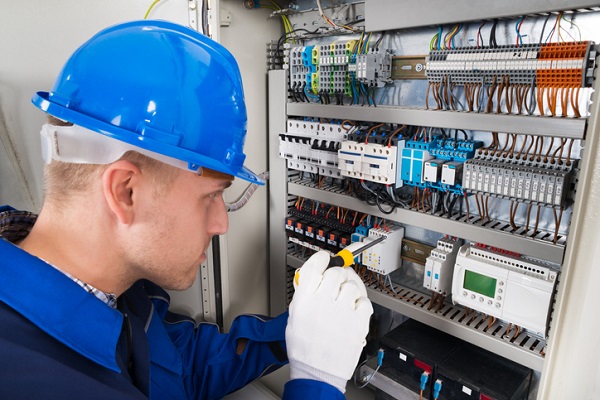
2. You Could Work in Any Environment Specializing in Maintenance
If you you’re the type of person who likes fixing things that are broken or not working properly, being a maintenance electrician may be the route for you. Travelling and commuting between different worksites is common for people in this job, so you could find yourself working in various environments. If you want a job where your workplace will change every day, this job could be a great fit.
As a maintenance electrician, you could be performing tasks like troubleshooting using testing devices, performing preventative maintenance, rewiring connections or electrical equipment in homes or businesses, or working on equipment in factories or manufacturing units. Regardless of where exactly your career after studying to become an electrician takes you, your problem-solving skills and ability to carry out the necessary maintenance procedures will serve you well if you want to become a maintenance electrician.
3. You Could Work in Office Buildings (or Outside Them) as a Commercial Electrician
Businesses need light and electricity during the work day and sometimes even at night, so they need commercial electricians to help set up their electrical systems and keep them running. In this environment, you could be installing lighting, wiring, and/or control and security systems, while adhering to all safety requirements.
Alternatively, you could work as an electrician on a construction site where a new office building is being built, or at a factory as an industrial electrician where you may work on hydraulic and other machinery. Regardless, whether you work in a small corner of an office building or a wide-open construction space, your career after electrician school can lead to you working for a number of successful businesses.
Want to get your electrician diploma?
Contact North American Trade Schools to learn more about our programs!
4 Interview Tips That Can Help You Launch Your Electrician Career in Construction
July 16, 2019Are you hoping to start a career as a construction electrician? Great! Becoming a construction electrician means stepping into a hands-on career that is anything but your typical 9-5 office job.
Progressing along this career path, however, still means that you need to prepare for the interview process. Fortunately, there are plenty of tips and tricks you can use to approach your interview with confidence.
Here are a handful of tips for when you’re about to step into an interview.
1. Be Ready to Encounter Basic Questions During Your Interview
Employers looking to hire electricians and apprentice electricians—including in construction—may sometimes ask you basic questions like “What is the difference between a breaker and a fuse?”. Should they do this, it’s to filter out the candidates who have the best foundational knowledge of the profession from the ones who don’t. If necessary, brush up on your overall knowledge of electrician-related concepts before your interview so you go in able to explain them in as much detail as possible.
2. Prepare for Questions About Challenges and Troubleshooting
While being interviewed, you can expect employers to be curious about your problem-solving abilities. After all, problem-solving is important to this career path. Therefore, you might face questions about how you’d handle unexpected situations, and perhaps the specific process through which you would try to solve the problem.
They may also ask questions like, “What was the biggest challenge you’ve faced so far in your career?” or “What was the biggest mistake you’ve made at a job, and how did you atone for it?” Either way, interviewers will want to know how you overcame these obstacles.
3. Be Ready for Construction-Specific Questions
A number of electricians work in specialized fields, and construction electricians are definitely among them. As a result, you can expect questions specific to construction. For example, they might ask you what you love most about the field, or why you’re interested in the position. They may also ask you what you learned during your electrician training, and what you ultimately took out of the experience. In any case, these employers are going to want to know how your training and experience makes you an ideal fit for the position.
4. Answer Questions Honestly, and Be Yourself
Whether the questions are technical in nature, or if they’re simply about your past experiences in the field, be honest and descriptive in answering them. Even if you flub a question or wind up not getting the job, it’s still great practice for future interviews you may get later in your career as a construction electrician. Above all else, smile, be enthusiastic, and be respectful and professional throughout the process! After all, if you want to become a maintenance electrician, you can’t forget the basic tenets of how to ace a job interview in any industry.
Looking to start your electrician career in construction?
Contact North American Trade Schools to find out about our Construction & Maintenance Electrician Pre-Apprenticeship diploma program!
3 Tips for Installing Security Lighting When You Become a Construction Electrician
June 19, 2019Outdoor lighting systems keep homes and businesses safe. When you become an electrician, you can help install security lighting systems that illuminate pathways and deter criminal activity. Some types of security lighting, such as alarm lights, can even alert building owners to the presence of an intruder.
A number of considerations go into creating an effective security lighting system, from seasonal concerns to where to actually place individual lights. Below we’ll look at a few tips for installing security lighting to help you succeed in your electrician career.
1. Security Lights Can Double as Attractive Ambient Outdoor Lighting
One of the benefits of security lighting is that it can easily double as ambient lighting. After all, both ambient and security lighting illuminate dark spaces and deter criminal activity. Path lighting, for example, is an attractive feature for walkways and gardens and also improves safety by ensuring people can easily find their way.
When choosing lighting that can work as both security lighting and ambient lighting, you’ll need to make sure the equipment you choose can manage these dual functions. For example, some types of lights aren’t suitable as security lights. High-pressure sodium lights, for example, look great because they create a soft ambient effect, but they also take up to a minute to warm up. That makes them unsuitable as security lights, which should be able to illuminate dark areas immediately. LED lights are typically the best option for lighting that is both aesthetically pleasing and works as a security feature.
2. Don’t Forget Seasonal Concerns When You Become a Construction Electrician
There’s a good chance that when you become a construction electrician you’ll be installing most security lighting systems during the summer months. However, it’s important to keep in mind how security lights will function during all times of the year. Spring and fall showers mean that lighting will need to be waterproof. Summer storms, meanwhile, can bring high winds and even hail, so strengthening lights with mounting brackets is often a good idea.
Of course, winter weather can be especially harsh. Not only will security lights need to be able to stand up to cold winds and ice, but they’ll also need to be placed where they won’t be buried in snow. Yard lights, for example, should be elevated so that they provide illumination even after a heavy snowfall. And keep in mind how security lighting deals with the shorter days during winter. Some lighting systems have to be adjusted manually to come on earlier during the day, for example. Other lights, like photovoltaic lights, can automatically detect when dawn and dusk are occurring and switch on or off accordingly.
3. Lighting Should Be Placed at Strategic Locations to Enhance Security
The locations of individual lights make a big difference in creating an effective security lighting system when you become a maintenance electrician. Areas around shrubbery and corners that can provide hiding places for criminals are ideal places for putting security lights. Likewise, paths, stairs, and doorways should also be illuminated.
The height at which security lights are placed is an important consideration. Generally, they should be placed high off the ground beyond reach of anybody on the ground. Doing so achieves two purposes: it allows them to illuminate a larger area and it protects them from being intentionally damaged by would-be intruders.
Security lights that are placed high up can illuminate a larger area and are protected from damage
Do you want to become an electrician?
Contact the North American Trade Schools to learn about our electrician training.


