Author: toppyhem
Considering Welding Training? A Day in the Life of an Apprentice Pipefitter
December 20, 2022
Pipefitters play very essential roles in the environmental context. They oversee the safe assembly, installation, and maintenance of a building’s pipe systems after studying the building’s blueprints. In addition, they also supervise the safe discarding of debris after every welding job, among other specialized duties.
To execute their duties optimally, pipefitters need to develop a unique set of skills. Some of these skills can be taught–trade schools in Canada offer programs that provide theoretical education. However, mastery of these skills can only be achieved through hands-on experience.
This is why a pipefitter apprenticeship is critical after completing your welding training. An apprenticeship typically lasts between three and five years. It offers a chance to learn the ropes of the trade under the watchful eyes of a veteran before you’re ready to stand on your own.
What do apprentice pipefitters do during this period? Here’s a peek at the daily routines of an apprentice pipefitter.
Apprentice Pipefitters Put Their Welding Training Into Practice
While a good welding program provides students with theoretical and practical learning, an apprenticeship enables them to truly dip their toes into the role, assisting and learning directly from veteran welders while putting the knowledge they learned into practice. The apprenticeship period allows budding welders to truly learn on the job.

Apprentice pipefitters honing their crafts under a veteran welder carry out their learning in the field. Apprenticeships are designed to give apprentices a good idea of what to expect from a career as a welder. To achieve this, greater emphasis is placed on practical education.
What this entails is that apprentice pipefitters are allowed to perform all the duties a veteran welder may be expected to perform, including:
- Testing pipe systems to ensure functionality and safety
- Assembling and securing tubes, pipes, and other fittings
- Installing, troubleshooting, and maintaining piping systems
- Testing installed systems and verifying compliance with industry standards
- Measuring, cutting, and threading pipes to specifications
- Using and maintaining industry-specific tools and equipment
Assist Veteran Welders
As part of their training, apprentice pipefitters assist master tradespeople with specific tasks on jobs. The apprentice may not be tasked with anything particularly dangerous or difficult at first; however, smaller tasks like fetching the welder’s tools, assembling and cutting pipes, and cleaning up the site after a job are part of the apprentice’s role.

With time, as the apprentice develops their skills and confidence, they will be trusted with more specialized duties.
Interact with Customers
As part of their welding technician training, apprentice pipefitters must develop soft skills. Hands-on training takes care of such skills as attention to detail and resilience, but good interpersonal and customer relations skills can only be honed through constant customer interaction. Thankfully, welding training takes care of these too.
On days when they go out on a job with their veteran welder trainers, apprentice pipefitters often serve as links between customers and the welder. They answer the customers’ questions and queries and relay their instructions to the welder.
Interested in training at a reputable welding college?
Contact NATS to learn more about our programs.
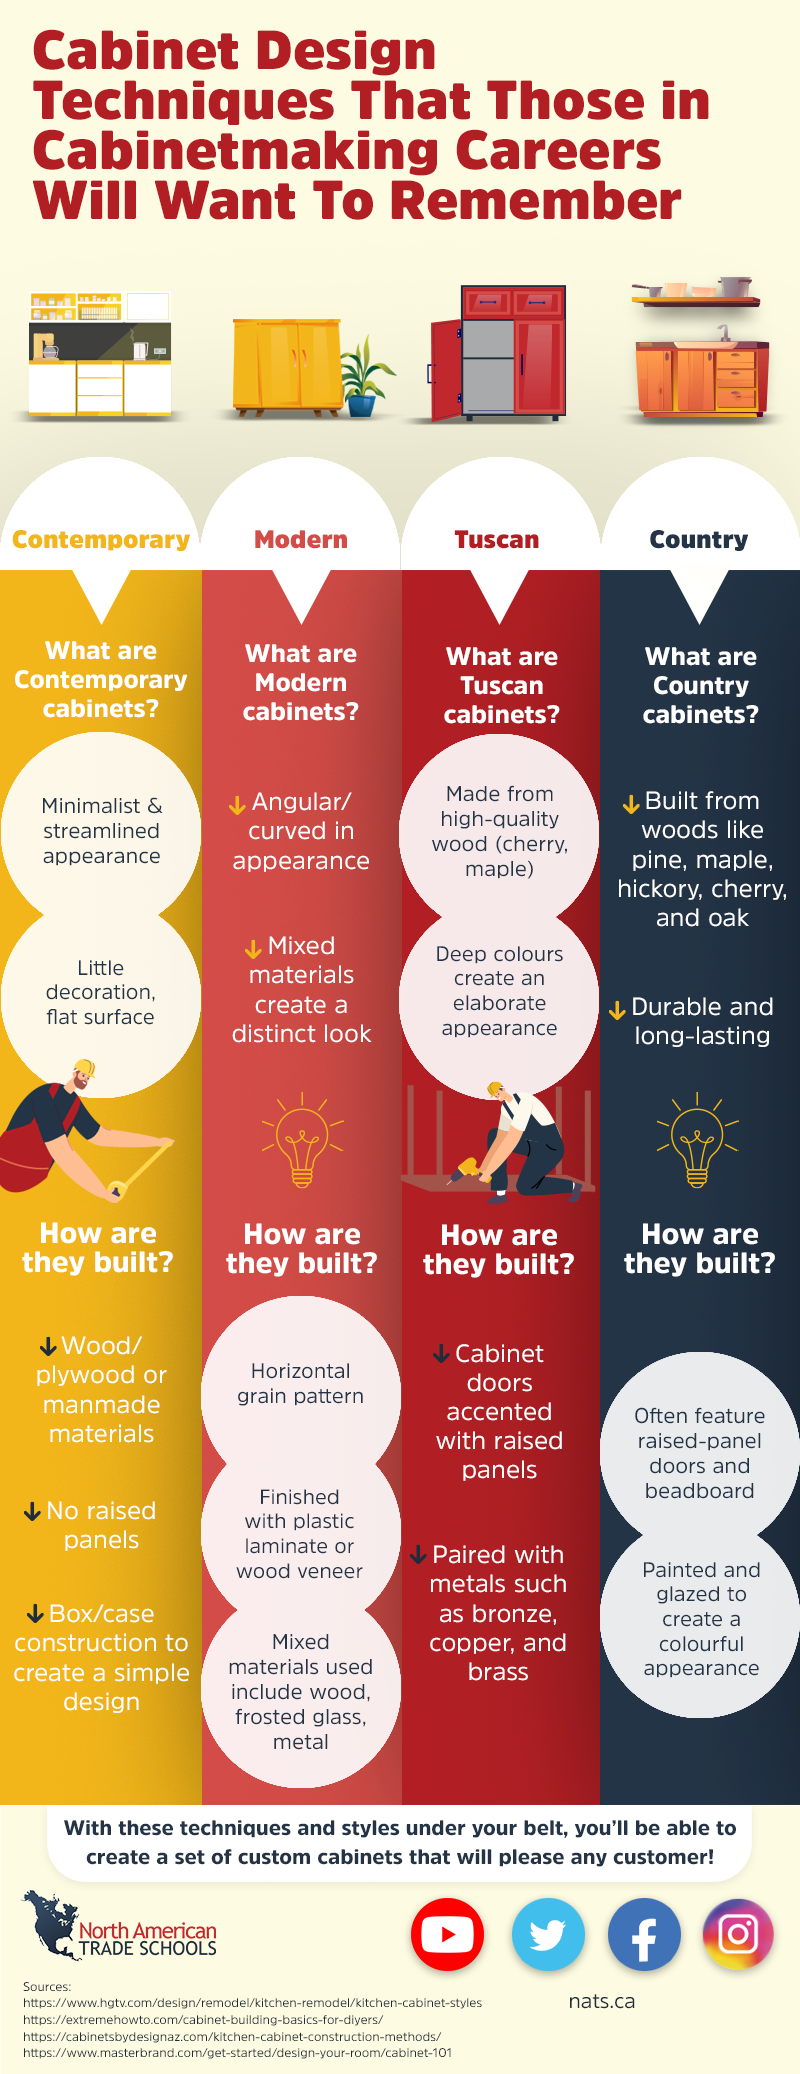
Cabinet Design Techniques that Those in Cabinetmaking Careers Will Want to Remember
December 08, 2022If you’re considering a career as a cabinetmaking professional, you’ll be an expert in the art of designing, building and installing different styles of cabinets. Not only will you be selecting the wood you’ll work with, but you’ll also operate different woodworking machines. You will also be responsible for putting together blueprints, using different techniques for assembling and finishing cabinets, and more. By mastering different design techniques during your cabinetmaking training, you’ll be able to perform a wide range of cabinetry projects–enabling you to accommodate your customer’s needs.
There are many different types of cabinets that can be installed in kitchens, bathrooms, and other rooms in a building. The more design techniques you are familiar with, the more advanced your skill set will be. Below, explore several cabinet styles and design techniques that you’ll perfect after cabinet making courses.
[Infographic] Cabinet Design Techniques that Those in Cabinetmaking Careers Will Want to Remember
Contemporary Cabinets
What are contemporary cabinets?
- Minimalist & streamlined appearance
- Little decoration, flat surface
Materials used:
- Wood/plywood or manmade materials
- No raised panels
- Box/case construction to create a simple design
Modern Cabinets
What are modern cabinets?
- Angular/curved in appearance
- Mixed materials create a distinct look
How they’re built:
- Finished with plastic laminate or wood veneer
- Horizontal grain pattern
- Mixed materials used include wood, frosted glass, metal
Tuscan Cabinets
What are Tuscan cabinets?
- Made from high-quality wood (cherry, maple)
- Deep colours create an elaborate appearance
How they’re built:
- Cabinet doors accented with raised panels
- Paired with metals such as bronze, copper, and brass
Country Cabinets
What are country cabinets?
- Built from woods like pine, maple, hickory, cherry, and oak
- Durable and long-lasting
How they’re built:
- Often feature raised-panel doors and beadboard
- Painted and glazed to create a colourful appearance
With these techniques and styles under your belt, you’ll be able to create a set of custom cabinets that will please any customer!
Sources:
https://www.hgtv.com/design/remodel/kitchen-remodel/kitchen-cabinet-styles
https://extremehowto.com/cabinet-building-basics-for-diyers/
https://cabinetsbydesignaz.com/kitchen-cabinet-construction-methods/
https://www.masterbrand.com/get-started/design-your-room/cabinet-101
Workmanship Best Practices to Remember After Electrician Training
December 06, 2022
Once you grasp the basics of electrical theory in training, it’ll be time to put your knowledge to work during your electrical apprenticeship. This will be an important part of your career development, providing you with the perfect opportunity to refine your practical skills, make professional connections, and earn a living all at once. Your apprenticeship is one big learning experience, and establishing good workmanship habits is one of the most important lessons you’ll learn.
As an electrician, good workmanship reflects positively on you and the company you are with. Excellent workmanship ensures public safety and simplifies future repairs. Referring to checklists, being conscious of wire sizing, and doing your best to complete your work in an orderly fashion will go a long way. Let’s dive deeper into some of the strategies you can use during your apprenticeship and your career!
1. Refer to a Checklist After Electrician Training
When you start out on the job, you’ll find there are many steps to the electrical wiring process, some of which can be a challenge to remember. In that case, it’s important to ensure that you’ve taken all the necessary steps to maximize the safety of your work–for your own sake and that of the public.
When you’re fresh out of electrician training, it’s an excellent idea to refer to a checklist when you start completing tasks independently. This will help you remember all of the essential steps to installing or wiring electrical systems. This checklist could be provided by your workplace or your training institution, or you can even use course material to create your own checklist, which one of your higher management can approve.

2. Always Be Conscious of Wire Sizing
Proper wire sizing is crucial to quality workmanship as it determines the safety, reliability, and consistency of an electrical system. For example, overloaded cables are one of the most common causes of electrical malfunction. This occurs when too much electrical current passes through–causing wires to overheat, melt, and pose a fire hazard. On the other hand, cables that are too big are a waste of money for clients and your company.
After electrician college, do your best to ensure that you’re accurately determining the electrical load for the systems you’re working on in order to choose your cable size correctly. Don’t hesitate to ask for second opinions until you trust your own judgment; safety should be your chief concern with cable size.

3. Keep Your Work Neat and Tidy
When you install and repair electrical systems, focus on keeping the finished work clean and tidy. Not only does it look better and leave a positive impression on you and your company, but on a practical level, it makes future repairs much easier, since there are fewer tangles, twisting, knots, and general confusion. The best way to ensure that your work remains neat and tidy is to take all the time you need to complete your work correctly and in an orderly manner.
Approaching your work while you maintain a clear mind will also be helpful.
The Construction and Maintenance Electrician Pre-Apprenticeship Diploma Program is an excellent place to start your electrical career. At NATS, you’ll gain the skills you need to apply quality workmanship to residential wiring, service installation, code interpretation, conduit bending, print reading, and electrical theory.
Ready to earn your electrician diploma?
Contact NATS to learn more!

Whether you’re ready to pursue a carpentry apprenticeship or you’re just thinking about taking the first step into cabinet making training, knowing the styles you’ll have to choose from will make your projects that much easier. In the case of kitchen renovations, cabinets can significantly impact the appearance of the whole project. Before creating custom cabinets for your own home or for future clients, you’ll want to determine the desired visual effect. Are you looking to follow the latest trends, or are you going for a timeless look? What kind of budget are you working with? Surely, you’ll come across one of the three styles covered below when it’s time to get your first project started. Keep reading for a look at some popular cabinet trends!
1. Flat Cabinets Are Both Inexpensive and Sleek
Flat cabinets check several boxes for many people. Not only are they sleek, stylish, and perfect for those who prefer a modern finish. They are often simple and inexpensive to make since there are fewer intricate details to add–which means there’s no need to purchase trim or moulding. This minimalistic look is particularly popular for those who prefer a more functional style.
Because a clean, smooth look is usually the preference with flat cabinets, naturally stained wood with little grain is a popular choice. They are also often painted using neutral colours. One pointer to keep in mind after completing cabinet making courses is to play around with the rules to add a unique touch. In your carpentry career, the goal is always to satisfy customer wishes. But feel free to use your creativity and experience when offering your professional opinion.

2. Traditional Styles Are Making a Come-Back
Many people are less concerned with trendy styles that can quickly become dated, and are opting for traditional styles that remain timeless. Traditional cabinets are inspired by an antique European aesthetic, which can create a luxurious and ornate feel. Naturally, this style tends to suit the skillset of more experienced carpenters. Unlike modern flat cabinets, you’ll see plenty of details like arches, raised panels on doors, and moulding. Heavier woods are popular choices for this trend. Recently, a rustic finish on traditional cabinets has been used to adapt the classic style, but you’ll see many variations during and after cabinet making school.

3. Look Out for Shaker Cabinets After Cabinet Making School
Shaker cabinets represent a balanced mix of the two styles discussed above. The style originates from an American movement in the 18th century, most known as the Shakers. Their style was famously utilitarian, emphasizing function and durability over frill. Shaker cabinets are described as austere and clean, though they can feature traditional details for some visual interest. Our Cabinet Making Diploma Program will teach you the ins and outs of woodworking, cabinet installation, and the carpentry trade, preparing you to bring both style and functionality to professional projects.
Ready to enroll in our cabinet making diploma program?
Contact NATS for more information!
Are you looking for a way to channel your creativity into a career? Taking cabinetmaking courses could be a great way to do just that. Cabinetmakers are artists who use their woodworking skills to create beautiful pieces of furniture for many different rooms of the house. From the beginning stages of design to the development of blueprints, and all throughout the manufacturing process, cabinetmakers produce pieces tailored to the specifications of the client or company they’re working for.
If you’re wondering what a career as a cabinetmaker could entail, you can find out everything you need to know about this profession, including what kinds of duties you’ll be performing and your opportunities for employment, in the infographic below. Read on to find out what a career will be like after cabinetmaking training.
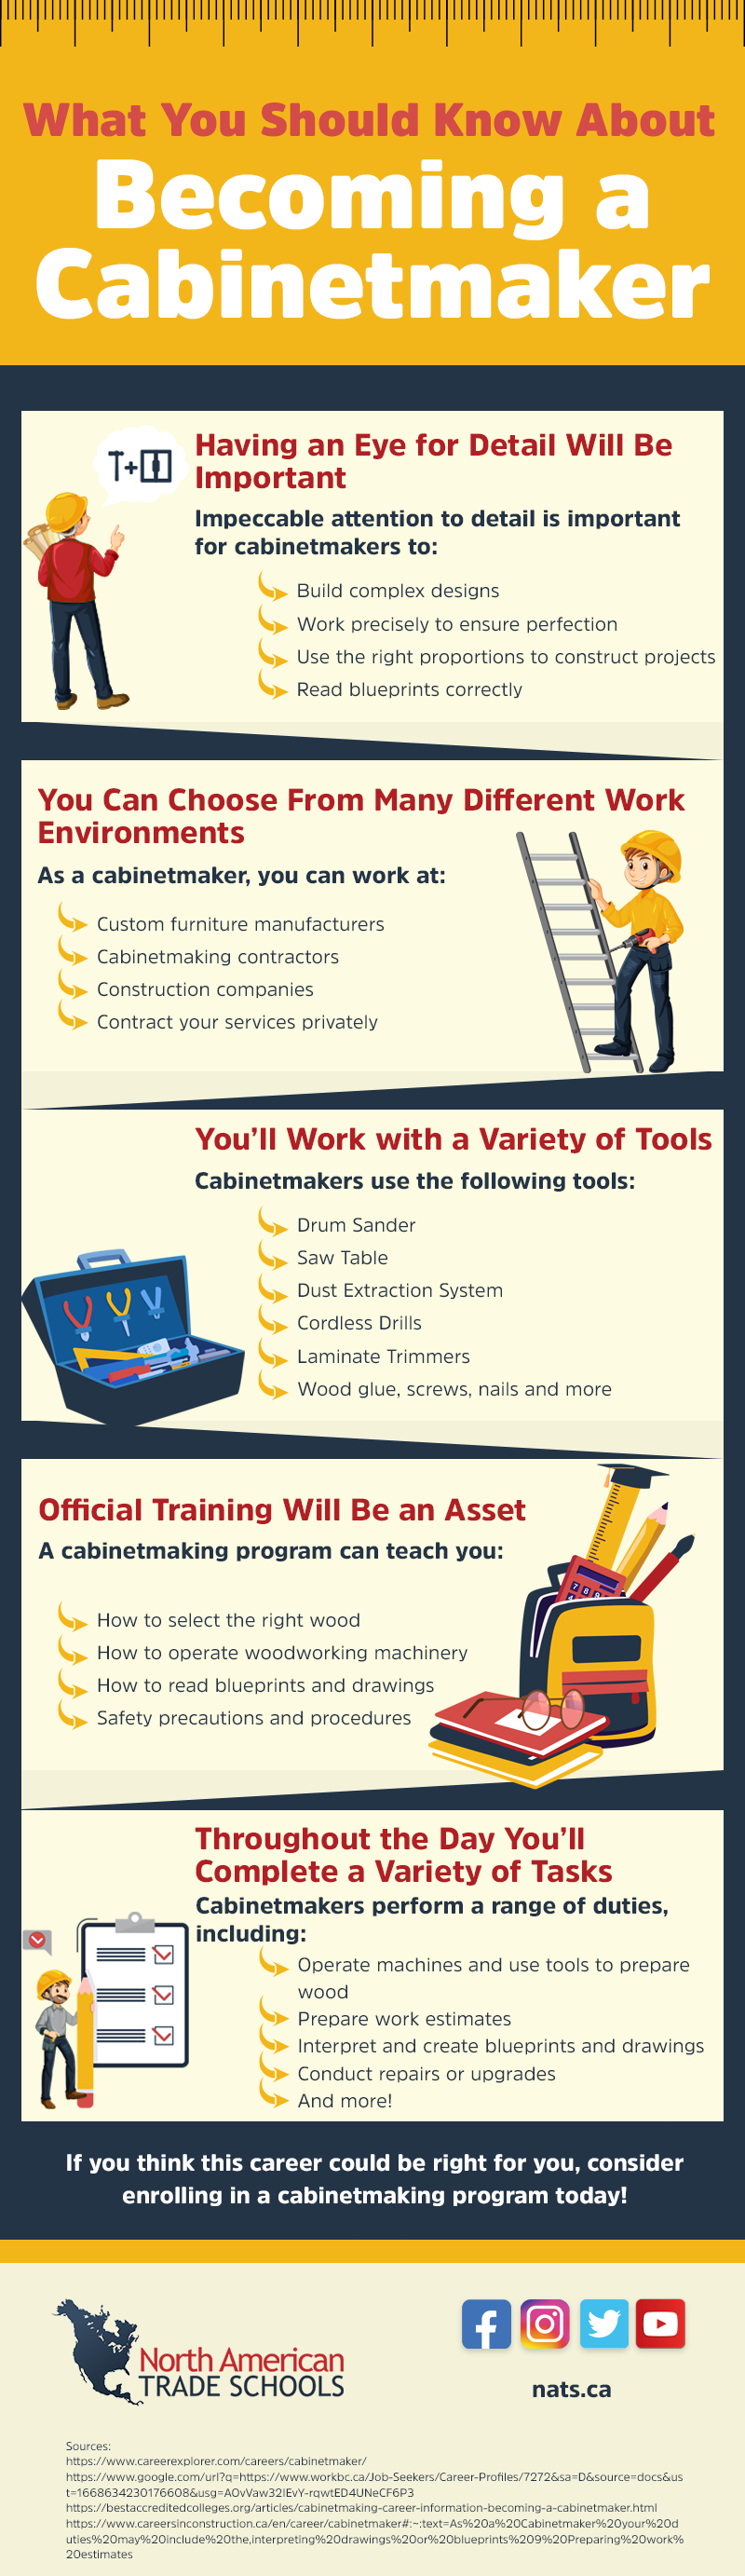
[Infographic] What You Should Know About Becoming a Cabinetmaker
Having an Eye for Detail Will Be Important
Impeccable attention to detail is important for cabinetmakers to:
- Build complex designs
- Work precisely to ensure perfection
- Use the right proportions to construct projects
- Read blueprints correctly
You Can Choose From Many Different Work Environments
As a cabinetmaker, you can work at:
- Custom furniture manufacturers
- Cabinetmaking contractors
- Construction companies
- Contract your services privately
You’ll Work with a Variety of Tools
Cabinetmakers use the following tools:
- Drum Sander
- Saw Table
- Dust Extraction System
- Cordless Drills
- Laminate Trimmers
- Wood glue, screws, nails and more
Official Training Will Be an Asset
A cabinetmaking program can teach you:
- How to select the right wood
- How to operate woodworking machinery
- How to read blueprints and drawings
- Safety precautions and procedures
Throughout the Day You’ll Complete a Variety of Tasks
Cabinetmakers perform a range of duties, including:
- Operate machines and use tools to prepare wood
- Prepare work estimates
- Interpret and create blueprints and drawings
- Conduct repairs or upgrades
- And more!
If you think this career could be right for you, consider enrolling in a cabinetmaking program today!
Sources:
Cabinetmaker | Careers in Construction
Cabinetmaking Career Information: Becoming a Cabinetmaker (study.com)

Are you looking forward to a career as a home inspector? If so, you will play a crucial role in the safety of the public. Your primary objective as a home inspector will be to serve as a consultant for home buyers seeking to make an informed decision about the residence they’re considering. Your expertise ensures that they don’t dig themselves into a financial hole, purchasing a home that will require expensive repairs or updates. Most importantly, you’ll make sure that your clients don’t purchase a home that poses a risk to their health and safety.
What kinds of risks should you be on the lookout for? While there is plenty to be aware of, dangerous mould will be a chief concern. What exactly is mould? What signs will alert you to a mould problem in a house? Keep reading for the answers to all of these questions below.
What Is Mould?
Mould is a type of fungi that can easily grow and reproduce in oxygen. It thrives in damp areas. In a natural environment, mould actually serves an important purpose in the ecosystem, aiding the decomposition of dead plants, animals, and other organic materials. That being said, when mould spores attach themselves to a building, they can pose a serious risk to the health of inhabitants.
Mould contamination can exacerbate respiratory conditions like asthma and allergies. Skin conditions, post-nasal drip, and flu symptoms are also not uncommon. There are multiple species of mould, but Penicillium, Cladosporium, and Aspergillus are most commonly found in buildings. Here are three signs to watch out for after home inspector training.
A Rotten or Musty Smell in the Air Could Be a Sign of Mould
Odour is one of the most obvious indications of mould–the smell of a mould-contaminated area is pretty distinct. You might notice a smell that resembles rotting or an odour that can only be described as damp. It’s common for the smell to come from carpets, cling to furniture, and spread from air conditioning and heating equipment, as these are all areas where mould spores can easily thrive and reproduce. Be sure to take a deep breath upon walking into a home you’re inspecting, and pay special attention to mould-friendly surfaces and basements, which are vulnerable to flooding and excessive moisture.

Watch Out for Warped Walls After Home Inspection Training
Warped walls are a visible clue you can easily spot after home inspector courses. You may see discoloration on walls and ceilings, bubbling paint, peeling wallpaper, the appearance of dark spots, cracks, and the loss of the wall’s original shape. These effects are a sign that mould is growing behind the walls. Over time, mould can weaken a home’s structure, making it more vulnerable to damage. As you can imagine, this will lead to a rather expensive repair process down the line.

Be Aware of Past Water Damage
As a home inspector, you’ll learn that damage in a house can be sneaky, presenting very few evident signs like the ones discussed above. With mould, it can take years for any symptoms to show themselves. For this reason, it’s important to be as knowledgeable as possible of a house’s history to evaluate whether there is a risk of mould contamination.
Sometimes, information from sellers is limited–intentionally and unintentionally–so watch out for signs of water damage during your inspection, like flooding, discoloured walls, and damp walls. If you’re excited to learn more about home inspections, you’re in the right place. The Home Inspection Program at NATS is designed to address inspection methods for roofing, electrical, HVAC, plumbing, exterior, interior, and insulation in accordance with the Canadian Association of Home & Property Inspectors (CAHPI) standards.
Ready to become a home inspector?
Contact NATS for more information!
Architectural Millwork: An Intro for Students in Cabinetmaking Training
November 16, 2022
Do you love working with your hands and seeing a future for yourself in the construction industry? If so, it’s a great idea to scope out all of the career paths available to you before getting started. If it’s not on your radar yet, you should definitely consider architectural millwork. It’s a great option for those who have a creative streak and an appreciation for aesthetics. Learn what architectural millwork entails, what sort of environments you can expect to work in, and what duties and skills are required. This rewarding career allows you to take pride in your handmade creations, which will be components of buildings for years to come. Keep reading for a comprehensive guide to architectural millwork.
What Is Architectural Millwork?
Architectural millwork (often called architectural woodwork) is simply the production of different components that will be used internally and externally on architectural structures. Your projects may be purely functional, decorative, or a bit of both, depending on the needs of your company’s clients. Common project types you may encounter include wall paneling, trim, doors, casework, staircases, and countertops.
Unlike traditional millwork, wood is not the only material you can expect to work with on a regular basis, as plastic laminates could show up from time to time. That being said, there are different types of architectural millwork. Keep reading to see which one you’d prefer to pursue after cabinetmaking training.

Work Environment Options to Explore After Cabinetmaking Training
There are two primary types of architectural millwork that could have you working in vastly different environments. Commodity millwork takes place in a manufacturing setting where the goal is to mass-produce pieces. Projects in this setting are usually made from cheaper materials since clients, often development companies, are looking to build as many structures as they can at the lowest possible price.
If you value workmanship over efficiency, seeking a position in a custom millwork company after completing your cabinetmaking diploma program is a great idea. In this environment, the goal will be to produce high-quality bespoke pieces for clients, and you’ll have the opportunity to perfect the artistry of your work.
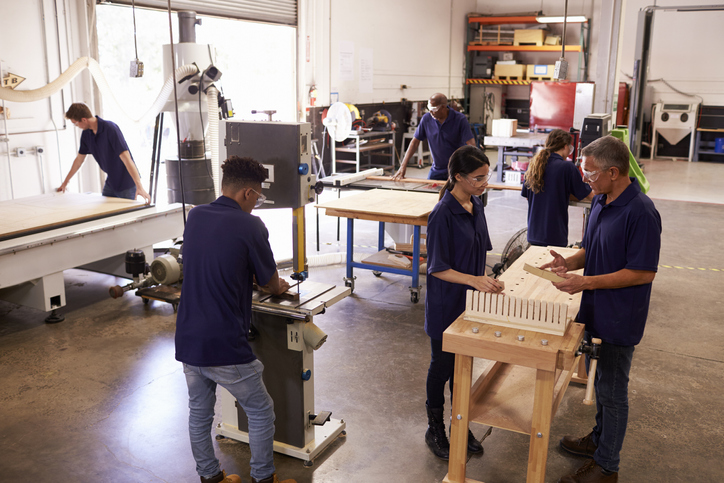
Required Duties, Responsibilities and Skills for Architectural Millwork
Effective architectural millworkers must have manual dexterity, an understanding of materials, and an eye for detail to produce excellent quality woodwork pieces. In addition, they must have the ability to work in a team with excellent communication and collaboration skills. The Cabinetmaking Training Program will prepare you to take on a position in a variety of woodworking careers. The program emphasizes hands-on carpentry, making it the perfect introduction for students interested in a future career in architectural millwork. As the development industry continues to thrive and skilled handiwork is needed, those who choose architectural millwork have a great chance of enjoying a hands-on, lucrative career.
Ready to enroll in cabinetmaking courses?
Contact NATS for more information!
How to Succeed in Your Electrical Apprenticeship After Electrician Training
November 15, 2022
The road to becoming a licensed electrician is a rewarding one. First, you’ll learn the fundamentals of the trade in a certified training program. Once you’ve learned the basics, you’ll have the opportunity to earn money as you learn during your apprenticeship. This is a great time to hone your skills, learn the electrical codes in your area, purchase the right tools, learn how to use them properly, and make meaningful professional connections. Let’s explore some effective ways to succeed during your electrical apprenticeship!
Ask Questions to Absorb as Much Information as You Can
You may need to approach your apprenticeship differently than you might other positions. While being able to earn an income is a huge perk of an electrical apprenticeship, your main priority should be to learn and practice your skills. Whenever you can, try to absorb new information. Listen attentively when others offer feedback and try to remember it. Keep your eyes open when licensed electricians complete tasks.
As you watch, look for parts of the process that don’t make sense to you and ask clarifying questions. As your apprenticeship progresses, try to answer some of your own questions using your prior knowledge and experience. That being said, it’s always a good idea to double-check when you’re unsure. Remember that mistakes are a normal part of the learning process, and try your best to turn yours into valuable learning experiences after electrician college!

Understand the National Electrical Code
This one may take some time. The Canadian Electrical Code is a long document published by the Canadian Standards Association. It’s full of information about how to safely install and maintain electrical equipment in Canada. It’s a great idea to make sure you have access to a copy that you can refer to when you need extra clarification. A clear understanding of electrical standards will help you stay safe on the job, as well as protect the safety of clients. Have faith in the learning process! With time, you’ll become familiar with the electrical code in your area. Keep in mind that the Canadian Electrical Code is revised every three years, so be sure to stay up to date.

Master the Art of Networking After Electrician Training
During and after electrician training, networking should be a priority. Your success in most fields will depend heavily on your ability to build meaningful relationships in the workplace–in addition to your skill and experience level, of course. On the job, try to be personable and open to meeting new people. You have no idea what conversation could lead to a major opportunity for career advancement, so always put your best foot forward and don’t hesitate to share your contact information when you’ve established a connection.
Your electrical apprenticeship will be an exciting phase of your career. The Construction & Maintenance Electrician Pre-Apprenticeship Diploma Program can help you find success as you learn and earn. Receive hands-on training on electricity principles and applications, blueprint reading, framing, and more!
Ready to enrol in earning an electrician diploma?
Contact NATS to learn more!

In recent years, we’ve seen record-high temperatures across the globe. Many homeowners are recognizing the importance of good ventilation and cooling units–and that’s where you come in as an aspiring HVAC technician.
HVAC technicians are responsible for the installation, maintenance, and repair of heating, ventilation, and air conditioning systems. Here are a few installation tips to remember when installing HVAC units, and how our HVAC technician program can help you launch a successful career in this industry!
1. Start by Determining Your Heating and Cooling Loads
The heating and cooling load refers to the rate at which heat should be supplied to or removed from a space in order to maintain a particular temperature range. Several factors go into determining this like the location, size, and age of a home. In addition, you’ll need to take into account the materials that were used to make up a home, the number of doors and windows, the amount of direct sunlight, the amount of shade, and whether or not the homeowners have special needs due to allergies and other health conditions.

Once you’ve come up with this important information, you can go on to take a look at the ductwork that’s been done and make any needed repairs or replacements. As you’ll learn in HVAC technician training, poor ductwork can cause imbalances and, as a result, block airflow and decrease air quality. To boost your ductwork, you may consider adding insulation that can improve the performance of HVAC systems.
2. Be Sure That You’ve Chosen the Correct Sized Unit
A large unit is not always better. If a system is too large for a homeowner’s space, it actually becomes inefficient. In fact, systems that are too large for a particular space can experience degradation faster, which will affect the longevity and performance of the unit. That being said, a small unit wouldn’t be appropriate for a large space as it will not effectively heat or cool the space.
How can you ensure that you’ve sized the unit correctly? First, determine the square footage of the space. Then, multiply the square footage by 25 BTU (British thermal units), the rough amount of energy it takes to heat or cool one square foot. This will give you your base BTU amount. Finally, take the height of the ceilings into account. If the ceilings are above 8 feet, multiply the base BTU amount by 1.25. This is a very basic calculation that does not take into account the climate, amount of people living in the home, or the number and placement of doors and windows. You’ll learn more about this process in HVAC school.

3. Make it a Habit to Check Your Lines After HVAC Technician Training
Refrigerant lines connect an outdoor air conditioner or heat pump to the indoor evaporator coil. It’s essential to check these lines for leaks. If you find refrigerant lines that are in poor condition, be sure to run high-quality replacement lines in a location that provides easy access. In the HVAC Technician Diploma program at NATS, you’ll learn how to install and maintain HVAC systems and work with tools like metal snips, electric drills, testing devices, and more. Students can write their G3 gas technician exam after the first module and the G2 gas technician exam after graduation.
Interested in our HVAC technician diploma program?
Contact NATS to learn more!

Homes are designed to last long and stand up to the elements, but even the most quality-built homes begin to falter as they age. Over time, these imperfections can seriously affect a house’s functionality and safety. If you’re considering a career as a home inspector, you will be responsible for finding these signs of aging for your clients during home inspections.
Throughout your training, you’ll learn all about the systems and components of a house, including roofing, structure, exterior, interior, insulation, and more. Upon completion, you’ll have a deep understanding of what you should look out for when you’re on the job–one of these things being signs indicating old age. Read on to learn 3 things you should watch for during home inspections that could signify old age.
1. Check For Water Stains When You Become a Home Inspector
As homes age, their roofs continually take the worst of the elements from outside. Over time, the roof may wear, and shingles may fall off, making way for leaks, which can cause significant damage to a home if they remain unchecked for too long.
Once you become a home inspector, it will be essential to inspect the roof for damaged or missing shingles. Aging shingles are more likely to have cracks that can allow water to pass through, while damaged shingles will begin to peel and curl as they wear down. These warning signs will let you know the roof needs to be repaired and provide insight into where water might have entered the home.

When water damage is combined with a lack of good ventilation in the home, the atmosphere can allow mould to grow – which can be dangerous to the health of the occupants. A quick way to identify whether a house might have mould is by its musty smell. If you think there may be mould, look for evidence within the house’s interior, especially in bathrooms, laundry rooms and other areas that tend to be humid. Signs to look out for are water stains or discoloured spots and stains on the walls and the ceiling, as well as sagging in the ceiling.
2. Check All of the Windows
Much like the roof of a home, windows take a lot o the brunt from outside conditions, as well. Over time, a poorly flashed or failing window will begin to leak. When you become a home inspector, it’s vital to begin your inspection with the home’s exterior. This way, you’ll be able to spot an old window. It will be thicker on the bottom than a modern window. It may still be in its original frame, displaying its age.
When wooden window frames are exposed to water, they begin to show signs of decay. If the wear is bad enough, the house water stains may appear close to the window. As an inspector, you’ll know this can indicate that:
- The window needs to be replaced.
- You should check the foundation for water damage. If there are water stains in the house, there is a good chance there is water damage elsewhere.
When you check the home’s interior, ensure no mould or dry rot surrounds the windows. Replacing an old window is quite the task, so your clients will appreciate knowing it may be a considerable task.
3. Look for Visible Cracks in the Foundation
In contrast to modern homes, older homes were mostly built using primitive concrete, which is more prone to breakage than the one that’s used today. As a result, when older homes move and settle, cracks can often form in their foundation, leading to issues further down the road.
Another issue to watch for after your home inspector training is the perimeter and underfloor drainage. In older homes, water can sometimes get stuck, often causing mould and decay to the foundation.
You will be able to spot a failing foundation with a few warning signs. During your inspection of a home’s exterior, you may notice visible cracks on the outside of the house, and inside, you may see slanted or bouncy floors.
Your training will teach you the ins and outs of home inspections, preparing you to enter this in-demand career.
Are you ready to start your home inspector career?
Contact NATS for more information.


