Author: toppyhem
Common Bathroom Remodeling Mistakes: A Look For Those in Home Renovation Training
November 20, 2020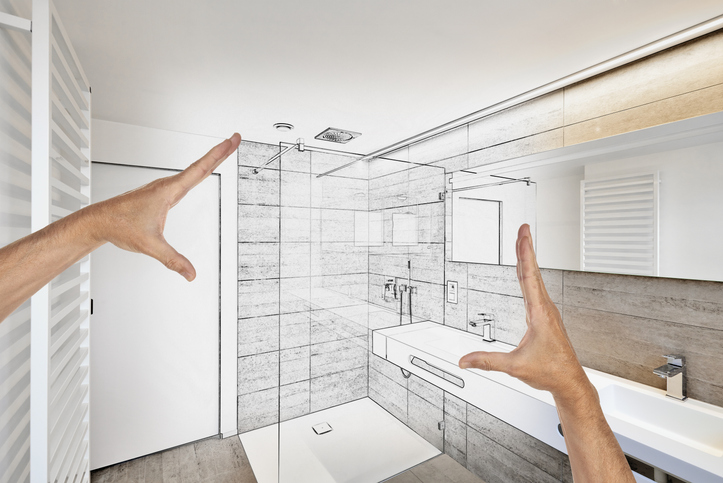
Remodeling a bathroom is a big endeavor in any home. Putting in a new bathroom can get expensive when taking into account the plumbing fixtures, ventilation, electrical wiring, and furnishings needed to create a quality space. If you’re remodeling a bathroom, it’s important to have a plan in place to ensure that the design is not only functional, but that the client will be satisfied with the result. When making renovation plans, be sure to be aware of these common mistakes so that you can both avoid a remodeling catastrophe and create a bathroom you’re proud of.
Those With Home Renovation Training Should Prioritize the Layout
When planning to remodel a bathroom, make sure you’re accounting for the many things that could affect the layout and function of the room. Failing to account for existing infrastructure, placing fixtures inefficiently, or making measuring mistakes can all lead to a bathroom remodel disaster. Plan ahead by figuring out where plumbing points will go and ensuring they work with the walls and features already in place. As those with home renovation training might know, moving these points can be expensive, and this will save both time and money.

Additionally, take the time to measure out the space for fixtures like bathtubs, vanities, toilets, and showers. Make sure that these fixtures have enough space between them to move around comfortably in the space, while still being able to clean between and around the fixtures. When measuring, consider the way that drawers will open, and make sure not to put the toilet in direct view of the opening door, because who wants to see that? Establishing a clear layout before beginning your remodeling project will help you to avoid unnecessary and hard-to-fix mistakes later in the process.
Don’t Skimp on Lighting
Lighting can make or break a bathroom. Too much overhead light can create shadowing, and lights that are too bright could work to make the bathroom less relaxing. Consider using multiple different lighting sources to create a layered design. Wall lights near the mirror make for optimal lighting when looking in the mirror, and LED strips are a good option for a softer light. If the lights are wired so that they can be turned on individually, everyone using the bathroom can be satisfied with the lighting by adjusting it to their liking.
Plan for Ventilation
If you’re in home renovation school, you’re probably aware that the bathroom requires more ventilation than most other rooms in a home. If the bathroom doesn’t have a window, a fan is required by code, but investing in a good vent is always a good idea. A fan will prevent condensation, damage to paint, and combat the growth of mold spores. Think about equipping the bathroom with a fan that has a timer switch to ensure that it’s being put to good use.
Mismatching Materials? Maybe Not
While it might be tempting to add splashes of colour to a bathroom by mixing and matching materials and textures, this will prevent the finished product from having a sophisticated, cohesive feel. Try to use a maximum of two different kinds of tiles, woods, or metals, and make sure to choose materials that are meant for a bathroom. Because of the temperature changes and higher than average moisture levels that bathrooms face, installing materials not made for the bathroom could lead to mildew or warping. By avoiding these mistakes, you’ll be ready to build a bathroom that’s both functional and appealing.

Do you want to become a home renovation technician?
Check out the North American Trade School’s program options.
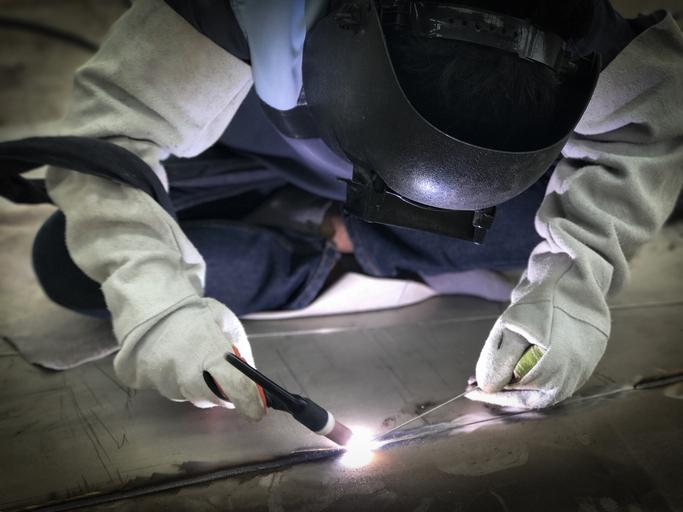
 Welding, while a safe profession when the correct precautions are taken, involves many risks and hazards. Welders can work with high temperatures, gases and fumes, electrical voltage, sparks, and ultraviolet rays. In order to protect themselves against explosions, burns, fumes, eye damage, and more, welders must ensure that they are following safety best practices. If you’re thinking about becoming a welding operator, make sure that you’re aware of these safety tips in order to ensure that you’re always staying safe on the job.
Those with a Welding Career Should Stick to a Routine–Before, During, and After a Welding Job
Before beginning any welding job, it’s important to cover all your bases to ensure that the area you’re working in is as safe as possible. Welding operators should always review their operating manual, which contains all the safety information and regulations provided by the manufacturer.
Make a list or mental note of things to check for before, during, and after your welding project. If you’re in a welding career, check for any hazards before beginning your project, such as flammable materials nearby. Make sure to check the equipment you’re working with. Is it functioning properly? Could you injure yourself accidentally on nearby equipment? Do you know where everything is for easy access? During your project, stay mindful of surfaces or surrounding materials that could be hot and should be avoided. After you’ve finished the job, make sure to clean up your workspace. Return all equipment, and ensure that there’s no possibility of a fire occurring.
Wear the Right PPE (Personal Protective Equipment)
Welders should never begin a project without wearing the right PPE (personal protective equipment). Your PPE will keep you injury-free and protect you from burns, vibrations, and exposure to ultraviolet rays. Your PPE should consist of cotton clothing treated with flame-resistant properties. Wear leather boots that cover your ankles, and never roll up your sleeves or cuffs or unbutton your shirt, which can allow skin to become exposed to sparks or enable sparks to catch in cuffs or pockets, where they can burn. When welding, always wear safety glasses with side shields to protect your eyes from debris and sparks, and always wear protective gloves. Wear a helmet equipped with the proper shade lens for your project to prevent exposure to arc rays, which can cause painful injury to eyes and skin.

Ensure You’re Using Proper Ventilation
If you’ve attended welding school, you’ll understand the dangers of overexposure to welding fumes. In order to avoid this, make sure that your workspace is equipped with proper ventilation systems to remove fumes and gases from the breathing zone. Adequate ventilation will depend on the type of base metal and rod you’re using during your welding project, as these contain different levels of metal oxide compounds. It’s likely that your employer will provide a ventilation system, but make sure to wear a respirator unless you’re sure that exposure levels are below safety limits.
Take Precautions to Prevent Fires
Welding arcs can pose a lot of danger due to the intense heat and sparks they create. Make sure you remove all flammable materials from your work environment or cover them with a fire resistant material before beginning. Check to make sure you know where the fire extinguishers and alarms are located, check that they are functioning, and identify the fire exit nearest to you. If welding near flammable materials, have someone keep an eye on the sparks. Always stay in a work area for at least 30 minutes after finishing a project to ensure that the sparks created will not start a fire.

Stay Dry to Prevent Electric Shock
Welders should take great precautions to ensure that electric shock doesn’t occur, as shock can result in injury or death in serious cases. Electric shock can occur by contact with an electric circuit, which commonly occurs when two metal objects that have voltage between them are touched, or when secondary shock is experienced from a welding circuit. Always inspect electrode holders for damage before starting a project, checking that they are properly insulated, which ensures that the welder will not touch the hot parts within the electrode holder. Be sure to wear gloves and PPE that is completely dry when handling electrodes or electrode holders.
Are you interested in attending welding college?
Check out the North American Trade School’s program options for future welders.
A Look at the Hottest Cabinet Trends in 2020 for Students of Cabinet Making Courses
November 03, 2020 If you’re wondering what will make for the most modern-looking cabinet in someone’s kitchen right now, look no further. When you’re in the middle of a home renovation project and you’re fixing up someone’s kitchen, you won’t want any of it looking dated compared to the rest of the room—and that includes the look of the cabinets. Whether they need a new paint job, or a full redesign or replacement, there are many techniques you can use to give them a fresh, modern look.
For any kitchen cabinets looking like they’re stuck in 1974, you can borrow from any of these current trends to give them the facelift they need. Here are some of 2020’s hottest trends in cabinet making.
Transitional Cabinets: Where Old School Cabinet Designs Meet the New
One major trend for cabinets nowadays is when older styles are mixed with current ones, such as when kitchens that were built decades ago are given a fresh update with modern-looking cabinets or other pieces. You can do this by using modern-day tiling and cabinet design while the rest of the kitchen pulls from design techniques of years past. If a client needing renovations for their kitchen wants to spruce it up and make it look more contemporary, while also not wanting to sacrifice too much of the traditional feel that made it look comforting in the first place, transitional cabinets are one way to accomplish this. This is an example of a trend that can be used for a variety of kitchen styles, and one that can apply well beyond 2020.
Open Shelving: How Students in Cabinet Making Training Can Make Kitchens Look Bigger
Students in a trade school learning about cabinet making may notice that some modern kitchens don’t even bother with cabinets that need to be opened and closed. Instead, some opt for shelves that put cabinet items on display for everyone in the room to see! To use open shelving in lieu of traditional cabinets is a great way to modernize the look of a kitchen, and make it more functional as far as using kitchen items without needing to open cabinet doors.

It also allows for the homeowner to save more space in their kitchen, or make the kitchen appear more expansive, particularly if it’s smaller in size. It’s a decidedly more minimalist approach to the use of cabinets, but it’s a good way for homeowners to make their most prized kitchen possessions the star of the show.
Integration: Hiding Range Hoods and Appliances for a Better-Looking Kitchen
One thing that students in cabinet making training might notice about modern cabinet designs is that some present-day kitchens are looking increasingly streamlined. Components that were once ostentatiously exposed are now integrated within the kitchen, or seemingly hidden altogether. This is especially true for dishwashers, range hoods, ovens, and refrigerators.

These components would be fitted alongside custom panels to appear integrated with the cabinets surrounding them, and give off a sleek, uninterrupted appearance. The cabinets and kitchen would look more cohesive, and this style would also make parts that would otherwise stick out within the kitchen appear as if they were part of the wall to begin with.
Do you want to take cabinet making courses?
Contact North American Trade Schools for more information!
How Has COVID Impacted Home Renovation Trends? Here’s a Look for Students in Home Renovation Training
October 27, 2020 The global pandemic has shifted many of our behaviours, including the amount of time people are spending at home. Due to social distancing and isolation rules, people are forced to stay within the confines of their houses more than ever before, leading many to examine their surroundings with a more scrutinizing eye.
Whether it’s due to boredom, lots of unused vacation budget to burn, or from a genuine dissatisfaction with their surroundings, people seem to be engaging in a lot more home renos since the pandemic hit. To learn more about what kinds of renos they’re opting for, let’s check it out!
The Shift from Open Concept to Closed-off Living Spaces
Ever since the pandemic began boxing families in together to an unnatural degree, many people have been expressing an interest in moving into new construct homes. According to a recent survey, requests for these new builds are overwhelmingly for designs that have more rooms with closed doors—a move away from the open concept home with a combined kitchen, dining area, and living room. The design trend is clearly connected to the need to spread family members out into more areas of the house so that everyone can work or study from home in privacy and peace.
The Home Office Reno
As a result of the work from home shift, many design and reno pros are receiving requests to help homeowners create more private spaces for work and study. Basements, guestrooms, pool sheds, and other spaces are being converted into home offices, learning rooms, or play areas for those with smaller children. Existing rooms are also being converted to accommodate the new normal, with corners of bedrooms and dining rooms as examples of home areas being fashioned into small, functional workspaces.

The Need to Create “Staycation” Spaces
With no clear end to the pandemic in sight, one trend noted by experts is a transformation of the home into the ultimate staycation spot. People who decide to spend on these luxury changes are often sitting on cash they’d saved up for a vacation, choosing to spend it on home improvements instead. Unlike the functional home office reno, the objective with the “staycation” home reno is to make some part of the home feel more luxurious to provide the feeling of relaxation one might expect on a vacation.

Pros seasoned in home renovation technician training can put their combined electrical, plumbing, and carpentry chops to work to help these homeowners realize their visions. One of the most common pandemic staycation splurges observed by reno pros is the full backyard overhaul to include more luxe outdoor seating and dining spaces, with lots of new decks, patios, pools, and hot tubs getting installed. Home cinema and game room requests are other examples of pandemic bonus-room spends.
The Long-Haul Reno Requested of Pros with Home Renovation Training Backgrounds
Some designers have noticed a trend in homeowners who’ve already made major purchases—such as a pool installation or complete patio re-design—placing advanced requests for ongoing improvements to their new space. As the seasons change, many people want to keep enjoying their outdoor spots by adding a few extra creature comforts. As a result, those with home renovation training backgrounds are using their know-how to meet lots of requests for outdoor fire pits and cozy patio fireplaces as homeowners look to extend the use of their outdoor spaces.
Homeowners are also putting advance requests in for ponds, entertainment rooms, outdoor gaming areas, and other projects they can look forward to—a clear move to make the home a more entertaining and enjoyable area for the family to spend time in, with the pandemic remaining unpredictable in how it might impact our habits in the days ahead.
Are you interested in learning more about the skilled techniques for accomplishing home projects through home renovation school?
Contact North American Trade Schools today for more information on its exciting diploma program!
 In the welding world, gas tungsten arc welding (GTAW)—also frequently referred to as tungsten inert gas (TIG) welding—produces welds via a process using tungsten electrodes. A shielding gas protects the weld pool area from air pollution, and inert gases such as argon, helium, or a mixture of the two are used.
Due to the high level of precision in this form of the trade, GTAW is typically reserved for high-quality jobs requiring more attention to detail. It’s also the form most appreciated by experienced welding practitioners, due to its ability to turn out stronger welds with cleaner, more artful results and higher integrity.
To understand more about GTAW welding, let’s take a look at five interesting facts about this method.
1. It Takes Longer to Master Than Other Welding Types
The finicky welding method of GTAW requires a lot of practice to perfect. In fact, it’s usually only attempted once a welder has a solid grasp in some of the more basic forms of the trade, such as metal inert gas (MIG) welding.
The more complex GTAW procedure requires a non-consumable tungsten electrode to run a current through the metals the technician is looking to weld together. After the metals have been liquified by the heat of the electrode, the filler material is hand-fed into the weld pool. Those interested in a welding career should know that this method is slower to perform than more basic “point and shoot” one-handed weld methods, and is a lot more difficult for inexperienced users to accomplish.
2. It Requires a Lot of Focus
Any type of welding is reliant on lots of concentration to avoid mistakes and accidents. If you’re attending welding school, you’ll be interested to hear that GTAW welding requires an even sharper level of focus. Both hands are needed to work on a GTAW job, with the welding torch in one hand and the filler material in the other.
A lot of concentration and a steady hand are needed to feed the wire as the operator attempts to move smoothly through the weld. The clean results at the end of this painstaking process come from a lot of patience, along with razor-sharp focus to prevent mishaps and unsightly errors.
3. Its Ability to Apply Controlled Heat Allows for Cleaner Results
On GTAW welds, a foot pedal controls the electricity coming to the torch, allowing for a level of deep penetration and accuracy that prevents the arc weld splatter one might get with a more basic type of welding. This control of the heat allows for much cleaner results—perfect for more advanced, high-precision jobs.
The welder doesn’t even necessarily need filler material here to get a successful join. This is important to remember, as welding requiring any filler material is usually a messier procedure. The precise metal-to-metal welds that GTAW welding enables allows for the operator’s desired smooth, clean surface. Producing an aesthetically-pleasing pattern and uniform bead, these welds often need no more than a light polish to finish.
4. It’s Ideal for Working on Stainless Steels
GTAW is well-suited to working on thin sections of light metals, including magnesium and aluminum. The method is particularly favourable for use on stainless steel welds. This is partly due to the aesthetics of these jobs, where the uncoated fabrication of the material means the weld remains exposed for the world to see. Additionally, stainless steels are a more expensive metal type, requiring significantly tidier finishes.
5. It’s More Expensive for Welding Career Pros to Complete
Due to the level of precision and attention to detail required, a GTAW weld is one of the most time-consuming jobs to complete. The process also has a low deposition rate to consider, with this rate measured in pounds per hour, deposited at a particular welding current. Additionally, a lot of GTAW welding equipment is at least twice as expensive as more basic tools of the trade.
Factoring in the time required from the highly-skilled welder multiplied by the hourly rate, plus the cost of resources needed on higher-quality jobs, these welds are much more costly to complete than other forms of the trade.

Interested in pursuing a thriving career by earning your professional welding diploma?
Contact North American Trade Schools today for more information on its exciting welding diploma program!
4 Things for Electrician School Students to Know About Electric Motors
October 15, 2020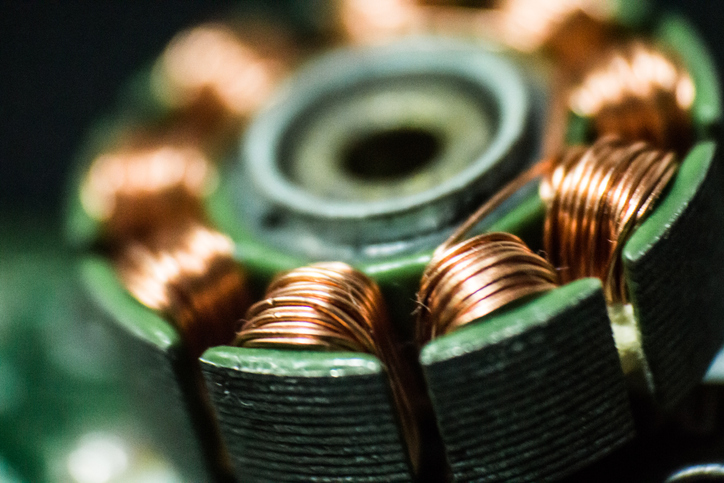
They’re found in appliances and toys throughout your house: remote control cars, electric can openers, computers, washing machines, electric mowers, electric toothbrushes, and much more. In fact, the electric motor might just be one of the most useful electrical inventions since Benjamin Franklin discovered electricity!
Most electric motors have a four-pole permanent magnet motor with double insulation design that runs at 120 volts. They work by adding electricity at one end, which sends a jolt to rotate the metal axle at the other end to power whichever machine the motor lives in.
What else should you know about these incredibly useful and common motors? Here are four things to keep in mind about their design and functioning.
1. They Work Using Electromagnetism
Those attending electrician school will learn electrical motor theory. When power is added, what really happens is that current flows through the motor’s coil to generate a magnetic force. One side of this force will flow in the direction the magnetic field is heading in, while a force generated on the other side of the housing will begin flowing the other way. Rotation on the armature thus happens, as an up-and-down action is created.
Most small household appliances like blenders and coffee grinders are run by a universal electric motor. This motor uses an electromagnet to take its energy from the DC or AC power feed, as the motor can be either AC or DC-powered.
2. Dynamic Braking Is Used for Safety
Most electric motors handle safety with the addition of a dynamic braking feature, also known as rheostatic braking. Located inside the circuitry of the motor, handle switch, and wire harness, the dynamic brake is activated upon the handle switch’s release. After the handle switch moves into the off position, the motor is brought to a complete halt.
There are also two other types of electric braking commonly found in the DC motor. Plugging—also called reverse current braking—gives greater braking torque than dynamic braking, and is more commonly used in larger machines such as printing presses and elevators. Regenerative braking is used when there is heavy inertia on the load on the motor, as one would find with an electric train.
3. Improper Maintenance Is the Leading Cause of Malfunction
Many electric motors will last longer if given the right level of care. Electric mowers and HVAC units are good examples of things needing regular maintenance, due to their exposure to grass, dirt, dust, and other contaminating elements.
At least once a year, an electric motor that can be contaminated in this way should be inspected and have all of its parts cleaned. This helps to avoid incidences of overheating by removing anything that may be clogging the filter and air cooling system of the machine.
4. Specialized Electrician Training Is Helpful for Attending to Repairs
To diagnose a problem with an electric motor, a technician with electrician training should start by using a digital multimeter to assess the components. Once a problem has been identified, the motor must often be disassembled to proceed with repairs. From there, the parts can be assessed for damage, corrosion, rust, or other contaminants. Brushes will often need to be replaced, along with any damaged parts, but rust and corrosion can usually be cleaned off with a wire brush.

Electric motors are an essential part of modern life, used to power all kinds of machinery in and out of the household. Most of the designs on these kinds of motors are built to last, and will tend to have a good lifespan as long as they are well-maintained. When problems occur, people rely on the specialist knowledge that those trained on electric motor theory can provide.
Interested in learning more about electric motors by receiving professional training at an electrician college?
Contact North American Trade Schools today for more information on our Construction & Maintenance Electrician Pre-Apprenticeship diploma program!
They’re found in appliances and toys throughout your house: remote control cars, electric can openers, computers, washing machines, electric mowers, electric toothbrushes, and much more. In fact, the electric motor might just be one of the most useful electrical inventions since Benjamin Franklin discovered electricity!
Most electric motors have a four-pole permanent magnet motor with double insulation design that runs at 120 volts. They work by adding electricity at one end, which sends a jolt to rotate the metal axle at the other end to power whichever machine the motor lives in.
What else should you know about these incredibly useful and common motors? Here are four things to keep in mind about their design and functioning.
1. They Work Using Electromagnetism
Those attending electrician school will learn electrical motor theory. When power is added, what really happens is that current flows through the motor’s coil to generate a magnetic force. One side of this force will flow in the direction the magnetic field is heading in, while a force generated on the other side of the housing will begin flowing the other way. Rotation on the armature thus happens, as an up-and-down action is created.
Most small household appliances like blenders and coffee grinders are run by a universal electric motor. This motor uses an electromagnet to take its energy from the DC or AC power feed, as the motor can be either AC or DC-powered.
2. Dynamic Braking Is Used for Safety
Most electric motors handle safety with the addition of a dynamic braking feature, also known as rheostatic braking. Located inside the circuitry of the motor, handle switch, and wire harness, the dynamic brake is activated upon the handle switch’s release. After the handle switch moves into the off position, the motor is brought to a complete halt.
There are also two other types of electric braking commonly found in the DC motor. Plugging—also called reverse current braking—gives greater braking torque than dynamic braking, and is more commonly used in larger machines such as printing presses and elevators. Regenerative braking is used when there is heavy inertia on the load on the motor, as one would find with an electric train.
3. Improper Maintenance Is the Leading Cause of Malfunction
Many electric motors will last longer if given the right level of care. Electric mowers and HVAC units are good examples of things needing regular maintenance, due to their exposure to grass, dirt, dust, and other contaminating elements.
At least once a year, an electric motor that can be contaminated in this way should be inspected and have all of its parts cleaned. This helps to avoid incidences of overheating by removing anything that may be clogging the filter and air cooling system of the machine.
4. Specialized Electrician Training Is Helpful for Attending to Repairs
To diagnose a problem with an electric motor, a technician with electrician training should start by using a digital multimeter to assess the components. Once a problem has been identified, the motor must often be disassembled to proceed with repairs. From there, the parts can be assessed for damage, corrosion, rust, or other contaminants. Brushes will often need to be replaced, along with any damaged parts, but rust and corrosion can usually be cleaned off with a wire brush.
Electric motors are an essential part of modern life, used to power all kinds of machinery in and out of the household. Most of the designs on these kinds of motors are built to last, and will tend to have a good lifespan as long as they are well-maintained. When problems occur, people rely on the specialist knowledge that those trained on electric motor theory can provide.
Interested in learning more about electric motors by receiving professional training at an electrician college?
Contact North American Trade Schools today for more information on our Construction & Maintenance Electrician Pre-Apprenticeship diploma program!
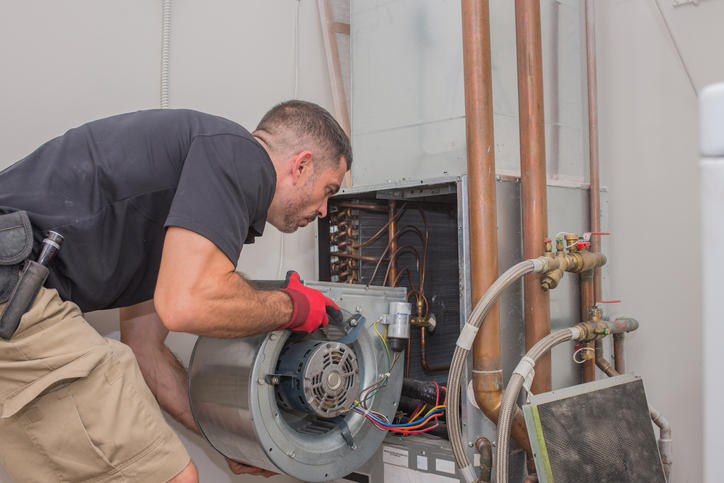
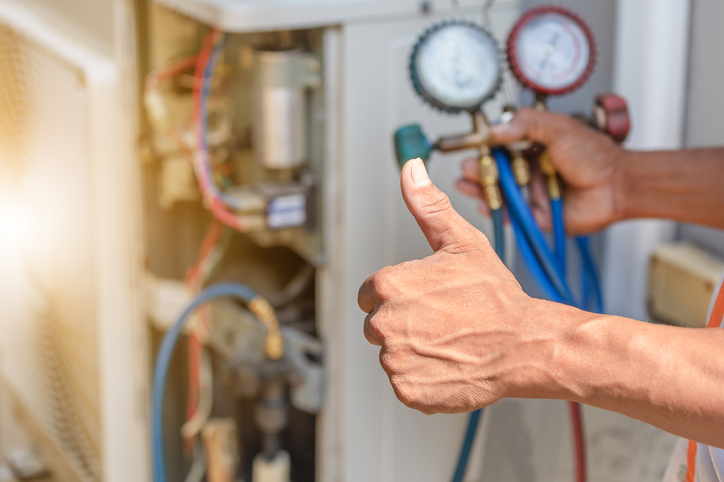 For future HVAC technicians just completing their training, there are many exciting career opportunities available. Graduates can look for jobs as HVAC Installers, Technicians, Maintenance Assistants, or Maintenance Technicians. In Ontario, job opportunities in HVAC are good. Part of the reason for this is that population growth is driving the need for more buildings, especially in certain urban areas.
When interviewing for your first job in HVAC, it’s important to know what employers are looking for and how to present yourself in order to ensure you’re putting your best foot forward. Read on for a few tips on how to ace your interview and land the job.
Know How to Highlight Your HVAC Training in the Interview
When interviewing for an HVAC career, it’s important to research the company you’re applying to, so that you know a bit more about what they could be expecting from you. Try to determine the types of services they provide (whether they’re primarily residential or commercial), what kinds of locations they cater to, and what kinds of equipment they typically utilize. This kind of information will help you to highlight the skills you have that will be most impressive to the employer.
Graduates of hands-on training programs like the North American Trade Schools’ HVAC technician training program can reference the marketable skills they know will impress their potential employer simply by doing a bit of research on the company they’re applying for.

Become Familiar with Possible Questions You Might Be Asked
While you might not be able to anticipate every question, it’s good to come prepared with a few possible interview questions. You’ll probably be asked simple but important questions like what motivates you, what about their company interests you, and other questions which allow them to get to know you as a person. They also might ask you some questions more relevant to the HVAC industry, such as inquiring why you’re interested in HVAC, what your driving record is like, and more. Prepare answers that show you’re ready for an HVAC career and have excelled in your HVAC training.
Prepare Questions to Ask Your Potential Employer
It’s also good to have in mind a list of questions that you would like to ask during the interview. These questions should be about the company specifically, demonstrating that you’ve taken the time to get to know them and showing them that you’re interested. Your questions could be about the company’s expectations for you as an employee, what a typical day on the job might look like, what about the company is especially unique, or any other company-related questions you might have.
A “Thank You” Never Hurts
Lastly, remember to thank the interviewer after you’ve finished, in addition to sending a follow-up thank you email. Make sure they know you’re interested in the job!
Think you have what it takes to become an HVAC technician?
Check out the North American Trade Schools program options today.
 Both MIG and TIG welding are procedures that use electrical arcs to create enough heat for melting down metals into liquids. Both methods use filler material to join metal pieces together, and inert gas is also used to prevent welding electrode corrosion for both procedures. Despite these similarities, these welding types remain quite different in their approach, and with different purposes for their use.
Generally speaking, MIG welding is a good low-cost bet for completing jobs on steel and aluminum quickly, whereas TIG welding is typically reserved for more expensive, high-quality, and precise jobs–requiring more training to master and taking a lot longer to complete.
For a better understanding of which welding type to use and when, let’s take a closer look at both of these processes!
What Is MIG Welding?
This type of welding is often called ‘point and shoot’ welding due to its similarities to aiming and pulling the trigger on a gun. Metal inert gas (MIG) welding works by feeding metal wire continuously from a spool connected to an electrode into the weld–with wire being used to join the two metal objects together as a filler material.
An electric current flows through the filler wire to produce an arc. While it’s touching the metal being welded, the arc is generated. With this short-circuit welding process, you move the gun at a steady speed along the joint upon starting the arc until the job is done.
Pros with welding technician training may know that MIG welding is effective on many thicker types of sheet metal. It’s also a lot easier to pick up as a trade, and a faster process than the more precise art of TIG welding.
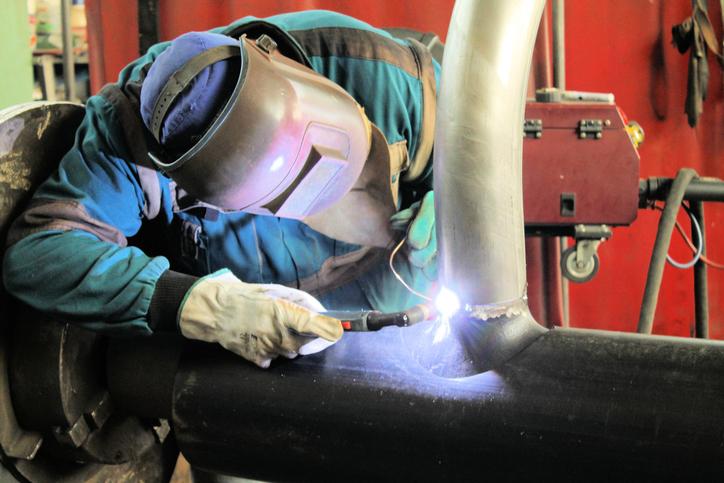
What Is TIG Welding?
If you’re interested in attending welding school, you’ll eventually hear about the more finicky art of tungsten inert gas (TIG) welding. Here, the metals you’re looking to weld together need to have a tungsten electrode running a current through them. Once the metals have been liquefied by the heat of the electrode, you join the pieces together by putting filler material into the weld puddle.
Unlike the one-handed use of a MIG welder, TIG welding requires both of your hands for the filler and the torch, since they are separate here. You control the electricity coming to your torch via a foot pedal, which allows for a level of deep penetration and accuracy that prevents the arc weld splatter that can result from a more basic MIG job.
In order to feed the wire, you must have a steady hand and stay extremely focused while moving through the weld. The level of control made possible by this procedure allows for a much cleaner weld—perfect for high precision, more advanced jobs. With TIG welding, you don’t even necessarily need filler material to get a successful join.
How to Decide Which One to Use After Welding Technician Training
With any weld job, looking at some key components of the work at hand will help you decide whether to use the MIG or TIG approach. Cost is your first consideration, with TIG jobs typically being much more time consuming, and therefore more expensive to complete. To execute fast and low-cost jobs, MIG is best.
The thickness of the metals you wish to weld is next on the list, with MIG welds generally being much more effective on thicker, bigger pieces of sheet metal than TIG. Finally, you should consider the aesthetics of the job. Welding requiring any filler material is usually a messier procedure. The precise metal-to-metal welds that TIG welding can enable is splatter-free, allowing for the smooth, neater surface you’re looking for.

When talking about MIG and TIG welding, it’s really not possible to say that one type of welding is definitively better than another. Both procedures are necessary in the world of liquefying and joining metals, and both take a good deal of training to master—with MIG being the more basic starter skill that can later lead to performing the more precise art of TIG welding.
Are you interested in pursuing a thriving career by taking professional welding classes?
Contact North American Trade Schools today for more information on its exciting welding diploma program!
How Those Considering a Home Inspector Career May Play a Role in Real Estate Transactions
October 01, 2020
When a buyer is ready to make an offer on a house, the next step is usually to hire a home inspector. The inspector’s job is to take a thorough, objective look at the property in question–from its roofing, structure, electrical and heating, to its air conditioning, plumbing, and siding to ensure the home is in solid condition.
While clearly in the buyer’s interest, the home inspection process makes most sellers nervous–with its potential to put a wrecking ball to a real estate transaction. A home inspection can even prove to be a disservice to the buyer if the job is poorly executed. For instance, an inexperienced or careless inspector can kill the deal by unnecessarily alerting the buyer to trivial issues. This can draw up a long list of minor problems in the final inspection report without adequately explaining the relative importance of these issues.
The right training teaches an inspector the most crucial aspects of the home inspection to focus on, and how to put minor defects into context to ensure the buyer’s confidence isn’t compromised, and the deal isn’t sabotaged.
What Exactly Does a Home Inspector Do?
Paid solely by the buyer, the job of the inspector is to conduct an objective evaluation of the home to make sure there are no issues with the functioning of the systems and components of the house, and that there are no existing safety hazards anywhere on the property.
Anyone wishing to become a home inspector will learn how to pay special attention to the building’s foundation and siding to make sure there’s no presence of cracks, warping, or rotting. The roof is another focal point, needing careful examination to exclude problems with shingles or gutters.
Inspectors must also ensure the home’s plumbing is leak-free, and that the water heater, wiring, heating systems, and any existing fireplaces are in safe working condition. The process usually takes no more than two to three hours, but can take longer if issues concerning compliance with building regulations are revealed.

Once the A-Z’s of the home have been examined, the home inspector is responsible for preparing an inspection report for the buyer. This document represents the condition of the home at the time of the inspection. The report also serves to list any defects that may need repairs. From the report, a buyer can make an informed decision on whether or not to complete the real estate transaction with the seller.
Why is Training Crucial for Someone Wishing to Become a Home Inspector?
Real estate professionals often complain about home inspectors that go too far with the inspection by raising attention to every tiny issue, and potentially causing irreparable damage to the buyer’s confidence.
A less helpful inspector might provide a long list of superficial issues – anything from minor surface mold, to cracked tiles, loose fixtures, and chipped paint – without explaining the minor importance of these issues, and the relatively low cost of fixing them.
Pros with home inspector training are taught to understand the weight that they carry in the real estate transaction, and learn the importance of focusing on major construction and systems points to consider on behalf of the buyer. They are given clear direction, for example, on how to detect signs of non-performance due to old age, weather damage, and poor workmanship. Additionally, trainees learn the importance of providing context to the buyer when revealing more minor defects, so the buyer isn’t unnecessarily scared off an otherwise superior build by a slew of minor, low-cost repairs.
What Does it Take to Become a Home Inspector?
A person with an interest or background in residential construction, as well as strong technical writing and time management skills would be an excellent candidate for home inspection training.
It might also be helpful to have some general people skills for dealing effectively with home buyers and real estate agents. Additionally, some engineering knowledge can be handy to correctly evaluate properties and follow established procedures more closely.

An inspector with the right training can provide an invaluable service to home buyers and gain a great reputation in the industry, leading to consistent recommendations and a steady flow of work.
Interested in training for a home inspector career to join this exciting and growing profession?
Contact North American Trade Schools to find out more!
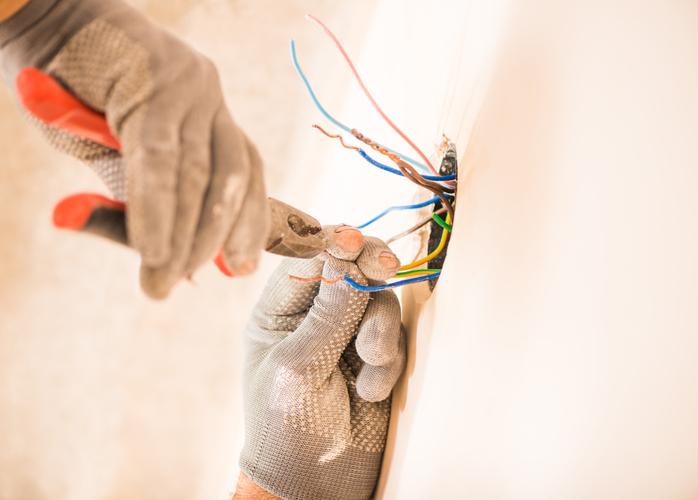
5 Facts About Residential Wiring for Those Interested in Electrical Training
September 29, 2020
If you’re considering becoming an electrician, you might be surprised by the variety of standards and regulations set in place for wiring systems in residences such as homes and cottages. Homes contain a variety of appliances and safety features which require electrical wiring. Hydro One, Ontario’s electricity provider, has a number of specifications in place for how they are to be installed within the home.
Here are five things to consider with regards to residential wiring.
Wiring Sizes May Be Different for Residences
For residences, common wire sizes may be different from other types of buildings. The American Wire Gauge Number (AWG) serves as the standard measurement of a wire’s diameter. Residences typically use four kinds of AWG wire sizes, with different amp circuit numbers for each: 8 (40 amp circuits), 10 (30), 12 (20), and 14 (15). The No. 8 AWG is often used for loads like electric ranges. No. 10 is used for loads needing electricity, such as dryers and electric water heaters. No. 12 serves loads like kitchen counter receptacles (e.g. appliances like microwaves). And No. 14 works best with loads such as lights (eg. lamps), switches, smaller appliances, and receptacles. Electrical box sizes may also vary, but this depends on several factors. These include the mounting of switches or receptacles, how many wire conductors are present, how many are in use, and the conductors’ sizes.
Many Different Appliances Require Electrical Installation in a Home
The home has a variety of appliances which have different electrical installation needs. The oven, refrigerator, dishwasher, counter spaces, built-in microwave ovens (and possibly more) all require consideration when planning for residential wiring. These appliances typically require their own, separate receptacle, from an entirely different circuit. As those with electrician training may know, any receptacle with 15 to 20 amp circuits must not only be marked, but tamper-resistant. This is because inserting any conductive object that is not a plug into the receptacle can cause electric shock. However, Hydro regulations state that, if a stationary appliance’s receptacle is a minimum of two metres above ground and/or out of reach, tamper resistance is not necessary. Prior to installation, be sure to mark on your floor plan where these appliances—and their corresponding receptacles—are located.
Different Rooms Within the Home Require Different Wiring Configurations
If you’ve completed maintenance electrician training, you will need to follow many requirements when working on residential homes. Hydro One has a set of requirements for each room in the house to ensure safe living conditions for residents. For one, each room must be equipped with a light controlled by a light switch. Two lights controlled by a three-way wall switch—one for the bottom and the top each—is required for any stairway containing a minimum of four stairs. Keep in mind that, on any two-wire branch circuit, 12 outlets are allowed at maximum. This includes receptacles and lights. Range receptacles must also be installed in the home with their receptacles marked on the floor plan.
Those With Electrician Training Should Plan to Install Smoke Alarms
Smoke alarms are an important and necessary safety feature for homes. They are required to be installed on each of the home’s floors, and a battery backup should also be present. Additionally, there should be one in each bedroom and an additional alarm in hallways attached to them. These smoke alarms must all be interconnected and should operate at 120 volts. Either a branch circuit with a receptacle/lightning combination or an unswitched lighting branch circuit can be used for these alarms.
Service Size May Depend on the Requirements of the Home
Typically, homes should have a distribution panel containing 24 circuits, and a service size of at least 100 amps. When calculating the service size, take into account the kilowatt demand. There are multiple factors which help to determine this, such as electric heating, the area of the floor, and appliances, among other loads that may be present. Although the service size should be larger if a home requires greater amounts of heating, most homes with a minimum 100-amp service size should be able to maintain both their typical electrical loads and electrical heating of up to 10 kW.
Do you want to become a construction electrician?
Check out North American Trade Schools’ programs today!


