Category: Cabinetmaking
Winter often gets people thinking about doing something productive with their time. If you have been thinking about a fresh start, a cabinetmaking course in London could be a smart first step. This kind of training is not just about learning how to use a saw or sand down rough edges. It is for people who want to work with their hands, solve real problems, and build a skill set that can lead to meaningful jobs. Whether you are looking to switch careers or just get started in the trades, cabinetmaking offers more than most people expect.
We work with students across Ontario who want more than bookwork. They want training that feels real from day one. When you step into the shop, you will be learning skills that matter on the job, not just in the classroom.
Exploring the Craft: What Cabinetmaking Really Involves
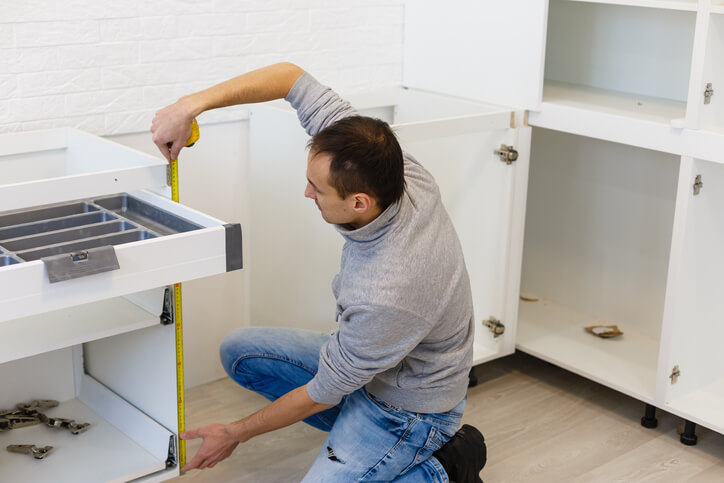
Cabinetmaking covers more than just furniture. It includes reading plans, using tools safely, measuring with precision, and working through each step of a build with purpose.
• Students learn how to read and understand blueprints, which helps them go from a simple design to finished, usable pieces
• Tool safety and proper use are part of everyday shop time, from table saws to clamps and routers
• Measuring, cutting, assembling, and finishing are done by hand as part of regular training, which keeps the work realistic
This is where design meets function. When students work through problems during a build, like getting a tight cabinet corner or adjusting a misaligned hinge, they are learning to think on their feet. These are real-world scenarios that help prepare them for working on job sites or even custom furniture shops. Since the training is hands-on, the skills become second nature over time.
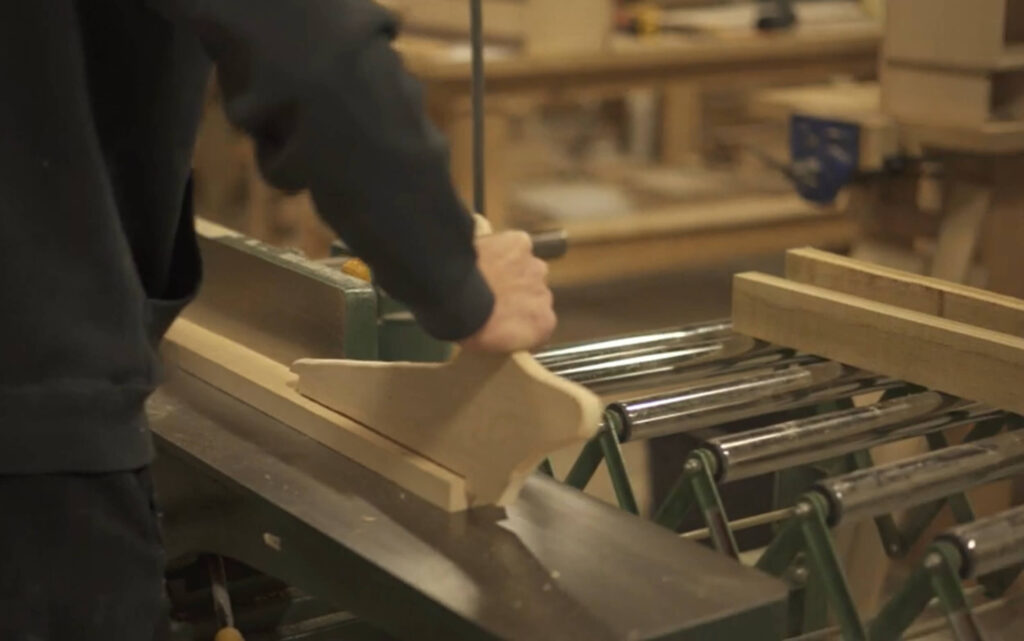
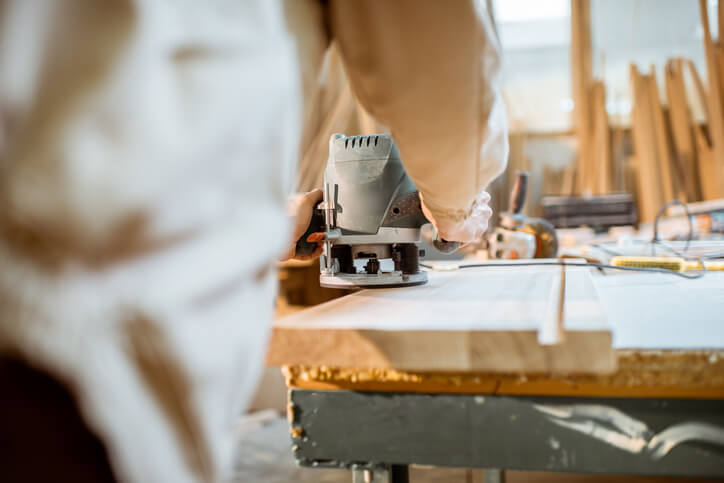
The Cabinetmaking program at North American Trade Schools in London includes modules on custom cabinetry, kitchen layout, lamination, workplace safety, and practical shop projects. Students have access to a modern woodworking lab and a range of industry-standard tools.
More Than Tools: Building Career-Ready Skills
There is another side to cabinetmaking that matters just as much as knowing how to cut or sand. In the shop, students also build habits that help them succeed in the workplace.
• Time management gets stronger because every build comes with a schedule
• Attention to detail is reinforced daily as even a small mistake in measurement can throw off an entire piece
• Workflow and personal accountability become part of every project
This kind of training is not just about what you make, it is about how you work. Employers want people who can stay focused, solve problems as they come up, and keep things moving safely on a job site. These soft skills make a big difference. They help students finish school with more confidence and a clearer understanding of what is expected in real work settings.
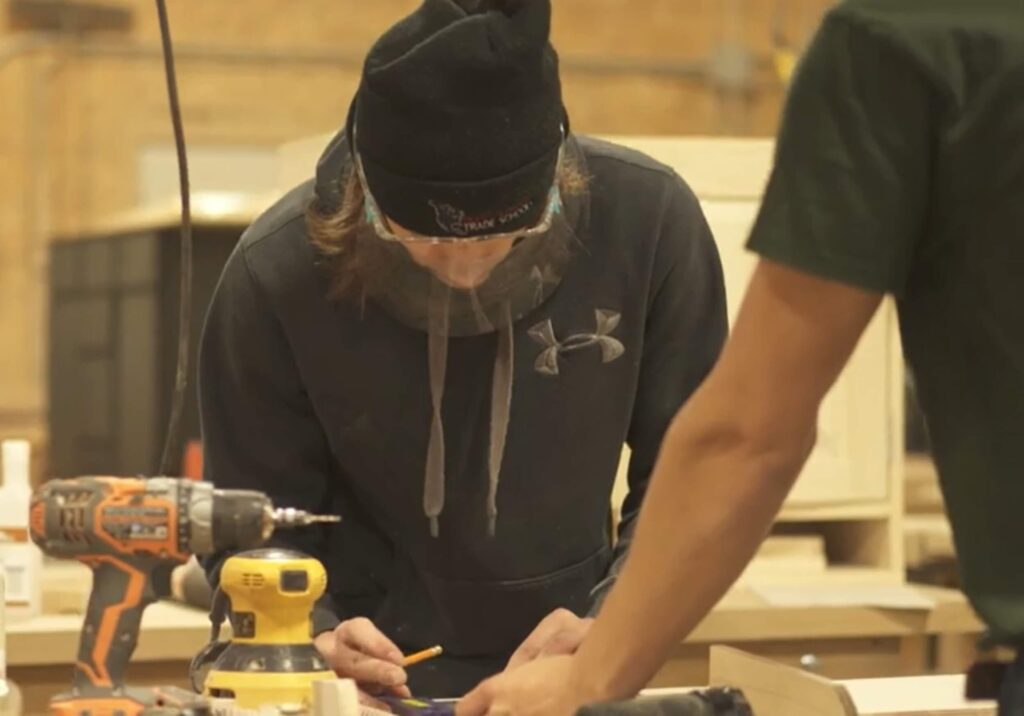
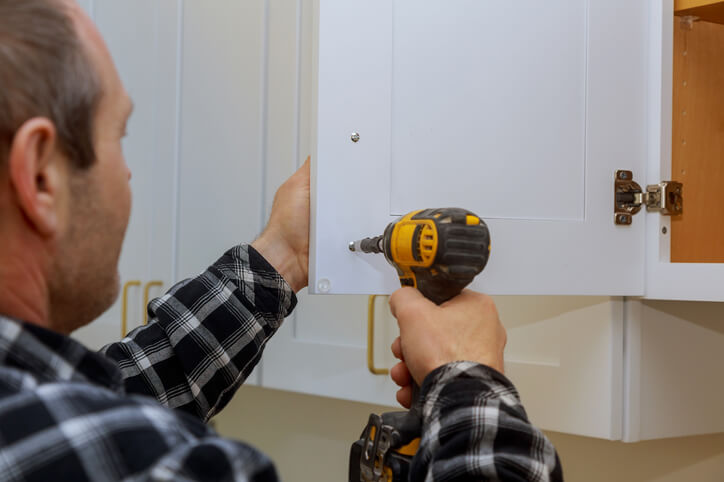
What You Will Learn Hands-On in the London Program
During the cabinetmaking course in London, you will spend much of your time working in a fully equipped shop. This is where ideas turn into real products. Students practice cabinet assembly, learn proper installation steps, and finish surfaces by hand.
We focus just as much on safety as we do on skill. Every part of the training includes safety practices that protect you and the people around you. That includes everything from knowing how to handle sharp tools to lifting heavy items the right way.
Cabinetmaking is not just about making one-off pieces. You are learning how to lay out an entire kitchen cabinet system, how to get parts to fit exactly, and how to install and trim pieces to look clean and professional. If you are considering this kind of career, you can review the full training process through our Cabinetmaking course in London.
Local Advantage: Why Training in London Supports Success
Training in London has direct benefits for anyone looking to work in southwestern Ontario. You are learning in the same region where many job sites and cabinet shops are located, which keeps your learning connected to local demand.
• New residential construction often needs skilled cabinetmakers for kitchens, bathrooms, and built-ins
• Commercial fit-outs for offices and stores rely on strong installs and custom woodwork
• Being based in the area can help with networking, job leads, and apprenticeships
When students train locally, they are more likely to stay connected to opportunities within the community. That connection helps new grads get hired and build real support systems early in their careers.
North American Trade Schools supports students with job search services, resume preparation, and local employer connections as they finish the Cabinetmaking program in London.
A Career Path That Grows with You
Cabinetmaking is one of those careers that does not stay in one spot. Once the basics are down, you can grow into different types of roles.
• Contract work lets you work for builders, designers, or directly for homeowners
• Shop careers often include specialty roles like CNC operator or trim installer
• Some grads use their skills to open workshops or small businesses
Early training can help open more than just one door. Skills in measuring, working from plans, organizing materials, and managing time carry into nearly any other job in the skilled trades. For people who want flexibility and room to grow, this trade can lead to long-term careers built on solid foundations.
Shaping Your Skills for What Is Next
What students take away from cabinetmaking training goes beyond machines and measurements. It is about building something solid that will last. That kind of work can be satisfying, especially when you know how much it matters on the job site.
Students leave the shop with job-ready skills, stronger work habits, and confidence in what they can do with their hands. Cabinetmaking combines creative thinking with practical, real-world planning. For those ready to take the work seriously, it is a trade that offers structure with room to grow.
Start Learning and Building Your Future in Cabinetmaking
Thinking about putting your hands-on skills to work in a rewarding trade? Our training in London can set you up for success. With a cabinetmaking course in London, you will gain practical experience from blueprint reading to real shop projects, equipping you to work safely and precisely in diverse settings. Whether your goal is to work in homes, commercial spaces, or your own shop, we focus on real-world preparation that leads to results after graduation. North American Trade Schools is ready to help you take the next step with the right training. Connect with us to get started.
Choosing the right wood is one of the first big decisions in any cabinet project. It affects how a cabinet looks, how long it lasts, and how easy it is to build and finish. Even before the first cut is made, the material you pick sets the tone for the whole job. The strength, colour, grain, and workability of each type of wood all play a part. This is why wood selection is often one of the first lessons in any credible training program.
But picking the right wood is only part of the equation. How you treat it makes just as much of a difference. Wood has to be prepared properly before it’s used. That includes drying, sealing, staining, and finishing. If done right, this process protects it from the elements and keeps the final product looking good over time. These are the kinds of skills that students develop through hands-on experience in the Cabinet Making program in London, where training starts with real tools, real wood, and real-time lessons.
Understanding Wood Types for Cabinet Making
Not all types of wood behave the same. Some are soft and easy to shape but dent easily. Others are strong and durable but harder to work with. Knowing the difference plays a big role in planning and building a cabinet that fits the job it’s meant for.
Here are two main categories of wood used in cabinet making:
Softwoods
These tend to be lighter in weight and easier to cut. They’re often used for internal framing or cabinets that won’t handle too much wear. Common types include:
- Pine: A light-coloured wood known for being budget-friendly and quick to work with. It can take paint well but may dent easily.
- Spruce: Often used in structural parts thanks to its strength. Its grain isn’t as prominent, but it’s still widely used in shelving and basic cabinet frames.
- Fir: Straight-grained and fairly strong, though it can split if not handled properly.
Hardwoods
These are better for visible surfaces and cabinets that need to handle wear over time. They cost more and take more skill to shape but deliver strong results.
- Oak: Known for its grain pattern and strength. It’s often used for cabinet doors and outer panels.
- Maple: Dense and smooth, maple accepts stains well and has a clean, modern appearance.
- Cherry: A reddish hardwood that darkens with age. It’s often used in upscale cabinetry for both looks and performance.
- Birch: Similar look to maple but more cost-effective. It stains evenly and takes finishes well.
In the Cabinet Making program based in London, students learn how to match the right wood to the design they’re following. They examine textures, weights, and grain direction, gaining experience in how each wood behaves once cutting or planing begins. This comes in handy later when clients want specific looks or when a build requires extra durability.
Best Practices for Wood Treatment
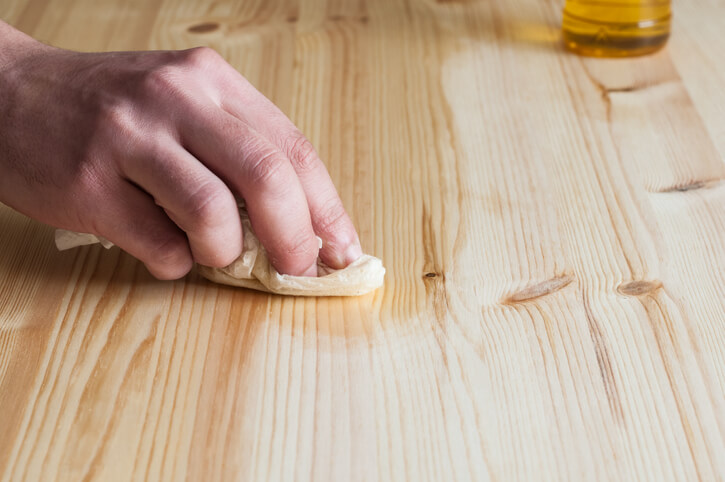
Once the type of wood is selected, it needs to be treated before it’s turned into cabinet parts. This protects the wood from moisture, wear, and warping. Treatment also impacts how the finish looks after paint, stain, or sealant is applied.
Here’s a simple breakdown of treatment steps:
- Drying: Wood must be properly dried to avoid issues like shrinking or expanding. Some woods come kiln-dried, but students learn how to check for leftover moisture before working.
- Sanding: This smooths out the surface so it can take finishes better. Starting with coarse grit and working to finer grades helps reduce swirls or gouges.
- Staining: Stain brings out or changes the wood’s natural colour. Proper staining techniques prevent streaking and uneven absorption.
- Sealing: A clear sealant helps lock in colour and protects the surface from moisture and wear. Some woods need pre-sealing before staining to avoid blotching.
Treating wood the right way helps improve both the look and durability of cabinets. Cutting corners here can hurt the final product. Students in London learn these steps by working with different wood types, so they understand how oak reacts differently than pine or when to pre-stain versus seal. These habits carry into every project, whether it’s built-ins, kitchen cabinets, or custom vanities.
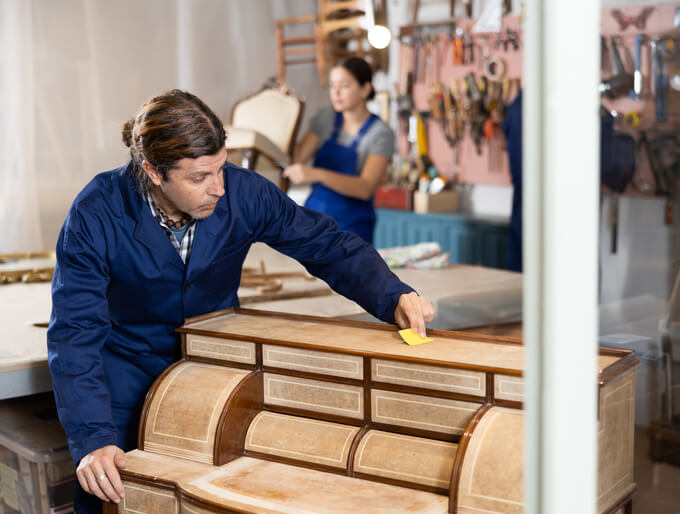
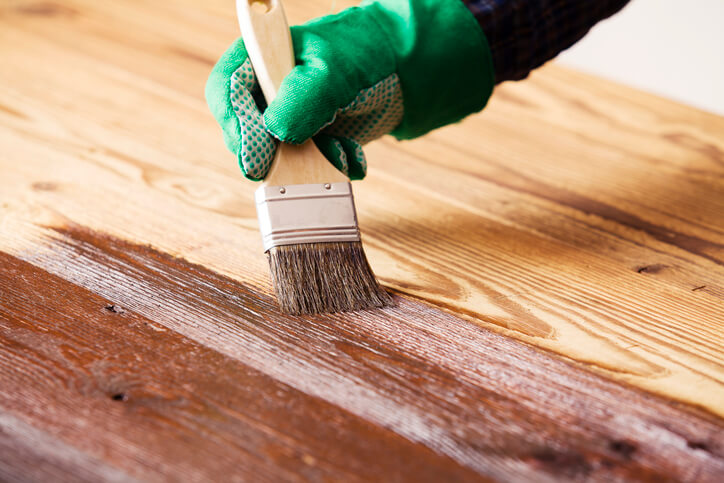
Techniques for Enhancing Wood Appearance
Bringing out the best look in the wood doesn’t happen by accident. Small steps like sanding or applying a coat of finish can change how a cabinet feels and looks when it’s finally installed. These touches aren’t just for appearance either. They help with long-term protection too.
Sanding is often the first step in the process. It smooths the surface and gets rid of small defects or glue residue. Starting with rough grit helps shape the piece, while switching to fine grit before finishing keeps lines crisp and surfaces clean.
Painting and staining come next. Some designs use paint to create a solid colour. Others show off the grain using stains. Getting good with these techniques takes practice, especially when matching colours across different cabinet panels.
Finish work completes the job. Whether it’s a satin varnish or high-gloss sealer, finishes protect the wood and bring out rich tones. At the London campus, students learn to use rollers, sprayers, and brushes depending on what the build calls for.
Even small choices like using a cloth to get into corners instead of a brush can make a big difference. This kind of detail often comes up during hands-on lab time when students work on real materials they’ll see again in the workforce.
Common Wood Treatment Challenges and How to Prevent Them
Even with the best tools and prep, issues can still come up. Knowing what to look for, and how to fix things fast, makes life easier on the job. That’s why these challenges and their solutions are part of London’s training.
Here are a few common treatment problems and how to avoid them:
- Warping: This can happen when wood isn’t dried correctly or is stored in a damp place. Always check moisture before working and store boards lying flat.
- Splitting: Force from screws or nails can cause cracking in dry or thin wood. Pre-drilling holes, especially with hardwoods, helps prevent damage.
- Uneven stain: Softwoods like pine can blotch when stain is applied unevenly. Testing on a scrap piece and using a wood conditioner helps fix this.
- Peeling finish: If the wood isn’t clean or dry before finishing, the top layer might peel. A tack cloth and careful timing between coats help improve results.
- Sticky surfaces: High humidity or too many layers too close together often causes a tacky feel. Spacing out coats and watching the environment gives smoother outcomes.
Students at North American Trade Schools in London run into these issues early while training. Whether it’s re-sanding a poor stain job or stripping back a peeling layer, working through problems in real time gives them solid know-how.
How These Skills Pay Off in the Trade
Getting good with wood takes more than just information. It takes repetition, working with real materials, and learning from errors. For those trying to break into cabinet making, this training gives them a clear edge when starting out.
Making smart choices about which wood to use helps projects last longer and leave clients happier. Knowing how to prep and finish that wood builds trust on any crew or site. These two areas become second nature after good hands-on experience.
Programs like the Cabinet Making diploma in London teach these skills from day one. Students get their hands on real wood, test different finishes, and build habits that stay with them throughout their careers. By the time they enter a real shop, they’re not guessing—they’ve already done the work in class. These early experiences become the backbone of every cabinet maker’s future.
If you’re aiming to turn your interest in woodworking into a practical career, exploring the cabinet making diploma in London could be the next step. North American Trade Schools offers hands-on training that helps you build real-world skills and the confidence to work on job sites with ease.
Cabinet making isn’t just about building furniture. It’s about precision, design, and the skill to turn raw materials into something finished and functional. At the heart of it all are the tools used on the job. Whether you are building kitchen cabinets, custom shelves, or detailed trim, the right tools make all the difference. They help transform ideas into clean, lasting work.
For people curious about a career in woodworking, learning how each tool works is a strong first step. That’s where hands-on training really matters. At a cabinet making school in London, students use the tools themselves, learning through practical work in real shop settings. Instead of reading about how a saw cuts, you actually use it, fix your mistakes, and get comfortable with every stage of the build. This kind of learning gives you confidence when you step into the trade.
Essential Hand Tools for Cabinet Making
Getting started in this trade means learning the basics, and the basics begin with hand tools. These are tools you’ll use daily on jobsites and in shops. They might look simple, but they’re key in refining your work, handling details, and finishing jobs right.
Here are a few hand tools all cabinet makers should know:
- Chisels: Great for cleaning out joints, shaping fine corners, and making detailed cuts. You’ll learn how to choose the proper size and keep them sharp for smooth work.
- Block Planes: These help with tiny adjustments like smoothing edges or surfaces. A few passes can fix tight fits or uneven joints.
- Hand Saws: Still used widely for precision cuts in tight spaces. While machines can handle bulk cuts, the clean edge of a hand saw is needed in many final steps.
- Measuring Tools: Tape measures, combo squares, and marking gauges are used constantly. Accurate layout work is important for creating cabinets that fit and function properly.
At North American Trade Schools, students in the Cabinet Making program in London get hands-on with these tools from the beginning. Whether it’s shaping drawer parts or perfecting joints, this training builds the solid habits and control that employers look for.
Power Tools That Make a Difference
Once you’ve got the feel for hand tools, the focus shifts to machines that do the heavy lifting. Power tools help speed you up, boost consistency, and handle bigger tasks that hands can’t manage alone.
Some of the key power tools used in the school and industry include:
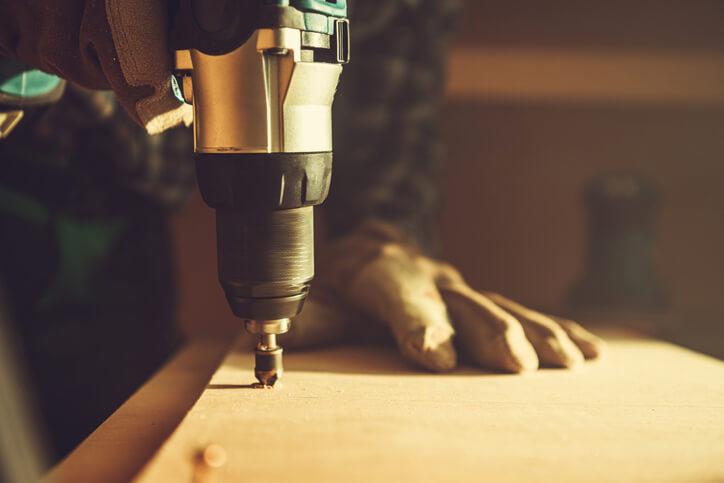
- Table Saw: One of the most important machines in any shop. This tool makes clean straight cuts and rips large sheets of wood. Learning to use it safely and precisely is a major part of your training.
- Router: Used for shaping edges, cutting slots, and adding decorative details. Different router bits create different profiles, and you’ll learn how to pick and swap them based on your build.
- Portable Sanders: Used for smoothing surfaces and edging. These are part of the final stages where surfaces need to be ready for finishing.
- Mitre Saw: Ideal for cutting clean angles. A sharp corner makes or breaks how trim and door frames fit.
Training to use these starts with learning how to set them up, adjust for wood movement and grain direction, and follow safety steps every time. In the London-based program, you don’t just watch a demo. You build projects using these tools in realistic shop settings. By the time you finish, you already have experience creating full cabinets with tools you’ll see again on the job.
Safety Gear and Practices
Part of being a pro in cabinet making isn’t just knowing how to make good cuts. It’s knowing how to work safely and avoid injury. In the London shop, safety is built into every part of training. You’ll learn what risks to watch for and how to work responsibly at each stage.
Common safety gear includes:
- Eye Protection: Safety glasses keep eyes clear of dust and chips flying off cuts.
- Hearing Protection: Machines are loud. Earplugs or earmuffs help protect your hearing over time.
- Dust Masks: Cutting and sanding wood raises fine dust. Masks protect your lungs from ongoing exposure.
- Proper Clothing: Non-slip boots and fitted clothing help reduce distractions and lower chances of getting caught in moving parts.
Beyond gear, the school teaches safe habits. That includes how to check guards, clean machines properly, unplug before changing blades, and stay alert. For example, if you’re using a table saw, you’ll also be guided on how to stand safely and guide materials the right way. These become habits with practice.
Machine maintenance is also part of the lessons. Students learn to reset tools, clean blades, and handle shutdown procedures—skills that build confidence and prevent common problems later on. All of this matters because being safe helps you stay sharp on the job while others trust you to get work done right.
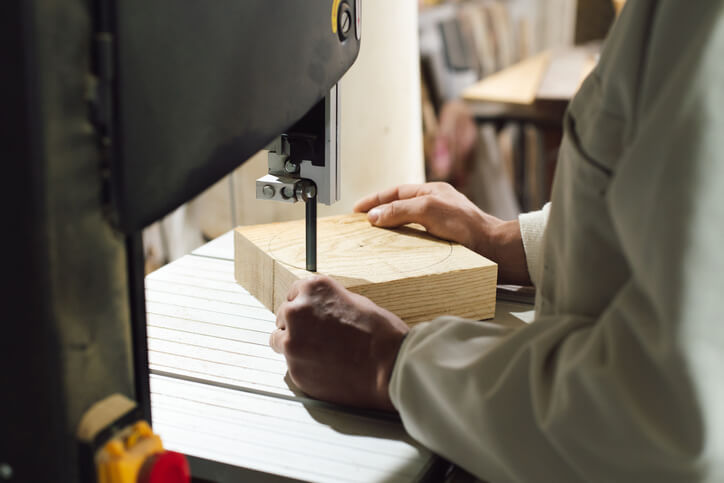
Advanced Tools for Professional Results
Once you’re confident with the basics, it’s time to level up with tools that deliver speed and high-level precision. These are what you’ll often find in custom shops or larger contracts where accuracy and timing matter even more.
Advanced tools include:
- Jointers: These flatten edges and surfaces before gluing wood together. Flat joints hold strong and make the whole piece look sharper.
- Planers: Used to make boards the exact same thickness. A mismatch of just a few millimetres can throw off a whole build.
- Bandsaws: Better for cutting curves and thicker wood pieces that table saws can’t handle easily.
- CNC Routers: These programmable tools let you cut designs and parts with high detail. They run from uploaded files and are great for logos, duplicates, or design features.
These tools require more setup and planning. Students at the London location work through steps like adjusting fence settings, lining up measurements, making dry runs, and troubleshooting outputs. You’ll learn to do it all from scratch.
Knowledge of CNC routers, in particular, adds a tech edge to your toolset. Custom wood shops are starting to use them more, and someone trained to operate and fix settings efficiently stands out after graduation.
Tools Are Just the Start
Learning how to use woodworking tools properly takes time, which is why hands-on training matters so much. You get real shop time, not just textbooks or video demos. Every screw-up turns into a lesson. Every project builds finesse and deeper understanding—from glue-ups to final finishes.
At the cabinet making school in London, this approach is built into your day. You’ll practice layout, measurements, and adjustments until they become second nature. You’ll learn how to react on the spot, fix cuts that go off track, or adjust joins so they lock in better. That’s the kind of thinking that makes you successful out in the field.
This trade teaches problem solving and patience, and it offers a range of paths—shop work, millwork companies, furniture making, or even starting your own business. Learning the tools is step one. Learning to use them with purpose and care is what takes you further. The more you practice, the more capable you become. With a solid foundation of tool knowledge and confidence built through guided shop time, you’ll be ready to step into a jobsite or woodshop and make an impact from day one.
If you’re ready to take the next step toward a career in woodworking, enrolling in a cabinet making school in London can give you the skills and shop experience you need to succeed. At North American Trade Schools, our hands-on training prepares you for the real work ahead with the guidance and tools that matter most in the field.
If you consider yourself a creative person, you may wonder how to channel this personal attribute into a fulfilling and lucrative career. Though plenty of planning and hard work lie ahead, it is possible to turn your dream into a reality, and we can help you!
Are you passionate about crafting beautiful, functional pieces of furniture? Do you dream of turning your love for woodworking into a profitable career? If so, cabinetmaking training at North American Trade Schools (NATS) could be your ticket to entrepreneurship. Keep reading to discover how we’ll equip you with the skills and competencies to thrive in your future entrepreneurial endeavors.
Why Cabinetmaking Makes a Profitable Business
Cabinetmaking is both an art and a science that combines creativity with precision. As a cabinetmaker, you can transform a simple piece of wood into a stunning piece of furniture that can last for generations. What sets cabinetmaking apart is the demand for custom, high-quality work.
In an era where mass-produced furniture is the norm, there’s a growing market for bespoke pieces that add a personal touch to homes and businesses. This demand presents the perfect opportunity for skilled craftsmen to establish a niche in the market. What sort of skills should you acquire to prepare for success in your future cabinetmaking business? Let’s explore!
Skills You’ll Acquire in Our Cabinetmaking Training Program
At NATS, we understand that a successful cabinetmaker needs a strong foundation in technical skills and business acumen. That’s why our comprehensive cabinet making training covers everything from the basics of woodworking to advanced techniques in design and construction. Here’s a glimpse of what you’ll learn:
- Cabinetmaking Fundamentals: Master hand and power tools, understand the properties of different materials, and learn essential woodworking techniques.
- Cost Estimation: Learn how to execute your projects in an economically sound manner and how to price your services appropriately.
- Drawing and Blueprint Reading: Learn how the design of cabinets works and how to interpret and follow drawings accurately.
Turning Your New Skills Into a Career
After cabinetmaking college, you’ll possess unique skills that can be the foundation of a successful career. With woodworking, design, and construction expertise, you can offer custom-made furniture and cabinetry that stand out in a market saturated with mass-produced items.
To turn your skills into a career, start by identifying your niche: luxury bespoke kitchens, custom office furniture, or unique storage solutions. Developing a strong portfolio showcasing your craftsmanship and design capabilities is crucial for attracting clients.
Networking with interior designers, contractors, and architects can also open new opportunities. Social media and a professional website can help showcase your work and reach a wider audience. Additionally, understanding the business side, such as pricing strategies, marketing, and customer service, is essential for turning their craft into a profitable venture.

Combining your technical skills with entrepreneurial spirit allows you to create a career that fulfills its passion for woodworking and meets the growing demand for personalized, high-quality furniture and cabinetry.
If you’re ready to turn your passion for woodworking into a thriving career, NATS is here to help. Our cabinet making training can be a pathway to entrepreneurship for any student willing to use their strategizing and planning skills. With our experienced instructors, state-of-the-industry facilities, and a curriculum designed for success, you’ll be equipped to take on the world of cabinetmaking and make your mark as an entrepreneur.
Are you ready to earn your cabinetmaking diploma?
Contact North American Trade Schools for more information!
Is Cabinet Making the Right Career Path? A 2024 Guide For Cabinet Making Students
January 03, 2024
Are you a student contemplating a career in woodworking and craftsmanship? If so, cabinet-making might be the perfect path for you. In 2024, the demand for skilled cabinet makers will continue to rise, making it an attractive career option for those with a passion for woodworking and an eye for detail.
Ready to commit to a career in cabinet making in 2024? This field combines creativity with craftsmanship. With training options ranging from certificates to apprenticeships and a promising job outlook, it’s an ideal path for those passionate about building and design.
The Art and Craftsmanship of Cabinet Making
Cabinet-making is a centuries-old trade that blends artistry with practicality. As a cabinet maker, you will craft functional and aesthetically pleasing storage solutions, furniture, and fixtures. The beauty of this profession lies in its ability to transform raw materials into pieces of art that serve both practical and decorative purposes.
The modern cabinet maker is expected to possess a diverse skill set. From interpreting design blueprints to selecting and preparing materials, your expertise will be crucial at every stage of the cabinet-making process. Proficiency in woodworking tools, understanding various wood types, and mastering finishing techniques are just a few of the skills you’ll need to succeed.
In 2024, the demand for custom-made furniture and unique cabinetry will continue to rise. Homeowners and businesses seek personalized solutions that stand out in design and functionality. This shift in consumer preferences presents an exciting opportunity for cabinet makers to showcase their creativity and craftsmanship.

Education and Training Will Contribute To Your Cabinet Making Diploma
Pursuing a cabinet-making career, beginning with some form of formal education, can be highly advantageous. Many vocational schools and technical institutes offer comprehensive cabinet making training programs (such as NATS’ Cabinetmaking Diploma Program) that cover the fundamentals of woodworking, cabinet design, and construction techniques. These programs are also tailored to impart a broad range of skills essential in the field. This education equips students with practical, trade-level skills and instills a deep understanding of different materials and techniques used in cabinet making. These programs prepare students to enter the trade with confidence and proficiency, ready to take on the various challenges this creative and technical field presents.
Additionally, apprenticeships offer valuable hands-on experience. Working under seasoned cabinet makers, apprentices learn the trade’s practical aspects, from material selection to intricate joinery techniques. Remember, keeping up with the latest design trends and technologies is key to staying competitive in the cabinet-making industry.
Job Outlook and Career Advancement After Cabinet Making Training
With the growing interest in bespoke furniture and high-quality craftsmanship, the job outlook for cabinet makers is promising. The versatility of this skill set opens doors to various career paths, including custom furniture design, architectural millwork, and even entrepreneurship.
Experienced cabinet makers often find opportunities to advance into supervisory or managerial roles, overseeing production teams and projects. Some may start their woodworking businesses, catering to a niche market or collaborating with interior designers and architects.
Is Cabinet Making a Good Career
So, is cabinet making a good career? Like any profession, cabinet-making comes with its challenges. The job’s physical demands, the precision required in measurements, and the necessity for patience are aspects that aspiring cabinet makers should be prepared for.
However, the rewards are significant – the satisfaction of creating functional works of art, the joy of seeing your designs come to life, and the potential for a lucrative career in a growing industry. On a more practical level, the financial rewards can be substantial, especially for those who establish a niche or start their own business. While the initial earnings might be modest, skilled cabinet makers are often in high demand, leading to higher earning potential.
Are you interested in obtaining your cabinet making diploma?
Contact NATS for more information.

Cabinet making is a skill and an art. Whether you’ve just finished a professional course or are embarking on a DIY journey, crafting a cabinet with precision and care can be immensely satisfying. However, even after creating a beautiful piece, installation’s another critical step. And this is where many enthusiastic cabinet makers stumble.
Here are some common installation mistakes made that could be avoided by those who completed the cabinet making courses.
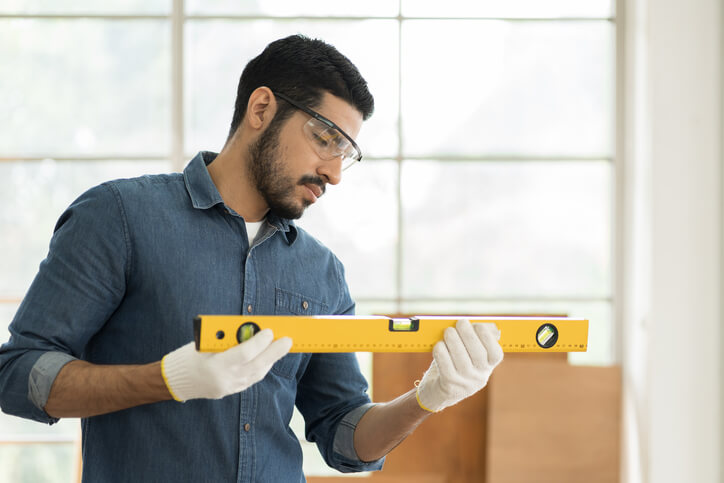
Failing to Check Measurements and Levelness
One of the golden rules in woodworking and cabinet installation is “Measure twice, cut once.” It’s easy to get excited and rush through measurements, but even a few millimeters off can spell disaster for your installation. Incorrect measurements can lead to gaps, misalignment, and a cabinet that doesn’t fit or function as intended. As it is one of the fundamentals discussed in the cabinet making training, always double or triple-check your measurements before making any cuts or installations.
A flawlessly crafted cabinet can be ruined by uneven installation. Cabinets that are not level can lead to uneven doors, difficulty opening or closing, or even long-term structural issues. Always use a trusted level system during installation and make necessary adjustments to ensure your cabinets sit perfectly as required.
Overlooking Wall Studs and Ignoring Spaces or Fillers
Mounting cabinets directly on drywall without anchoring them to studs is a recipe for disaster. Over time, the weight can cause the cabinets to pull away from the wall, leading to damage and potential injury. Always locate and mark the wall studs and ensure that your cabinet screws penetrate these studs for a secure installation.
Beyond this, every room has quirks, and the walls must not be straight. Spacers or fillers are essential to address these irregularities. They help ensure that your cabinet fits perfectly and has a professional finish. Ignoring them can lead to unsightly gaps or cabinets that jet out in odd ways.
Forgetting the Toe Kick as Taught in the Cabinet Making Courses
The toe kick is that recessed space at the bottom of floor cabinets, and it’s not just for aesthetics, as most cabinet making courses emphasize. It provides a comfortable space for your feet as you stand at the counter. It might seem like a minor detail, but omitting a toe kick can make your kitchen or workspace uncomfortable and can detract from the overall finished look.
Using Inadequate Hardware and Neglecting the Finish
It’s not just about the wood. Screws, brackets, and other hardware are crucial in securing your cabinet. Skimping on or using the wrong hardware can lead to wobbly cabinets or, worse, cabinets that fall apart after a short period. Invest in high-quality hardware that’s designed explicitly for cabinetry.
Also, after installing your cabinet, finishing it with sealants or paints that protect the wood and enhance its appearance is essential. This step will make your cabinet look polished and professional and protect against moisture, stains, and everyday wear and tear.
Are you interested in a cabinet making diploma?
Contact NATS for more information.

Have you ever wondered what life looks like for a cabinetmaker after completing cabinet-making courses? Cabinet makers craft and set up cabinets, desks, and other premium furnishings crafted from wood, plastic laminate, and solid surface compositions. They employ woodworking machines and power tools to cut, mold, and structure these items precisely.
Cabinetmaking is a unique and skilled craft that requires precision, creativity, and dedication. In this blog post, we’ll take you through a typical day in the life of a cabinetmaker who has honed their skills through cabinet-making courses, showcasing the challenges, joys, and rewards of this profession.
Blueprint Analysis and Dimension Verification
A cabinetmaker starts the day by meticulously inspecting the blueprints of the day’s project. Whether it’s a custom cabinet for a client’s kitchen or an exquisite piece of office equipment, understanding the design down to the smallest detail is crucial. One of the first tasks involves verifying dimensions. With a keen eye, they ensure every measurement on paper matches the intended physical output. This step ensures that the final piece adheres strictly to specifications, ensuring durability, aesthetics, and functionality.
Post blueprint analysis, the cabinetmaker shifts focus to raw materials. Selecting the right lumber stock or an appropriate wood substitute is a delicate choice, influenced by design requirements and client preferences. With a blueprint, they measure and mark the dimensions of the chosen material. Every mark has to be exact; after all, ensuring a tight fit and a top-quality product lies in these initial markings.
Machine Operation and Component Assembly
As the workshop hums with activity, the cabinetmaker gets into the heart of the process. Their cabinet-making training has made them adept at handling various woodworking machines – power saws, jointers, morticers, tenoners, molders, and shapers. Each machine has a specific role, from cutting and molding to shaping the wood or its substitute. Operating them requires skill, and after their courses, the cabinetmaker wields these machines with confidence and precision.
As individual components get fashioned, they are gradually assembled throughout the day. This assembly isn’t merely about joining pieces; it’s an art. The alignment must be perfect, and every component, whether a door hinge or a cabinet shelf, needs to fit seamlessly.
Finishing and Quality Inspection After Cabinet-Making Training
After assembly, it’s time to refine the cabinet’s surface. This involves sanding down any rough edges and applying a finish to enhance the wood’s natural beauty and protect it from wear and tear. Cabinet Makers often have a selection of stains, paints, and varnishes, allowing them to achieve the desired look for each project. This step can be time-consuming, but it’s essential for achieving a polished and professional appearance.
Before any project leaves the workshop, it undergoes a thorough quality control inspection. As they have learned from their cabinet-making courses, cabinetmakers meticulously check for imperfections, ensuring that the piece meets their high standards of craftsmanship. They also verify that all components, such as drawers and cabinet doors, function correctly. This attention to detail ensures that the final product will delight the client.
Once the cabinetmaker is satisfied with their work, it’s time to invite the client for a final inspection. This is a rewarding moment, as it allows the cabinetmaker to see the joy and satisfaction on the client’s face as they take possession of their custom-made piece. After client approval, the cabinet is carefully packed and delivered to its new home.
Are you interested in a cabinet-making diploma?
Contact NATS for more information.
This obviously does not apply to everyone, but there’s something so wholesome and fulfilling about rescuing items (or constructions) from potential ruin and restoring them to their original glory. If this desire to repair and add value applies to you, you probably are already considering home renovation college.
One area that often requires attention during a renovation is wood restoration. Wood can add warmth and charm to any home, but over time, it may lose its lustre and become damaged. Wood restoration is also one of the most common projects faced by home renovation professionals, so here are four wood restoration tips to help you bring new life to wooden elements in any home.
1. Assess the Condition of the Wooden Element
Before embarking on the restoration of your piece, it’s essential to conduct some research to ascertain its value. Carefully examine the furniture for any marks or labels that might provide insights into its origin or manufacturer. If you suspect that it holds significant monetary or historical worth, it’s advisable to consult with a professional before proceeding with any restoration work. It’s also a good idea to take detailed photographs of any markings or tags as documentation. Refrain from stripping or sanding a collectible antique’s finish until you have a clear understanding of its value, as doing so could potentially diminish or even eliminate its worth.
As you’ll discover in home renovation training, it’s crucial to assess the condition of the wood you’re working with. Take a close look at the surfaces, checking for signs of rot, pests, or water damage. Look for cracks, warping, or discolouration. Understanding the extent of the damage will help you determine the best approach to restoration. Minor issues might only require sanding and refinishing, while more severe damage could require repair or replacement.
2. Prepare the Surface Correctly as Taught in Home Restoration College
Proper surface preparation is vital for achieving a successful wood restoration. To give your furniture a comprehensive cleaning, start by using a sponge and a solution of warm water and vegetable-based oil soap. Scrub the surfaces of the furniture thoroughly to remove any dirt and grime. Rinse the surface with clean water and allow it to dry completely before moving on to the next step.
For intricate or detailed pieces, employ a soft toothbrush to access hard-to-reach areas and clean the nooks and crannies effectively. In case there are tight spots that are difficult to reach, you can fashion a slender wooden dowel rod into a pointed tip, similar to sharpening a pencil. This sharpened end can then be utilized to carefully extract grime from those narrow spaces.
If you have stubborn stains or old finishes, you may have to scrape them off with sandpaper or a wood stripper.
3. Choose the Right Finishing Method
The choice of finishing method will depend on the desired look and the type of wood you’re working with. Some popular options for wood restoration include staining, painting, and applying varnish or oil-based finishes. Staining can enhance the natural beauty of the wood, highlighting its grain and texture. Painting can provide a fresh and uniform appearance, while varnishes or oils offer protection and durability. Research different finishing techniques and consult with professionals to determine the best option for your specific project.
4. Home Renovation College Educates on Proper Restoration Techniques
Wood restoration requires careful attention to detail and proper technique, just as our home renovation courses explain. When sanding the wood, start with coarse-grit sandpaper to remove any imperfections, then gradually switch to finer grits to achieve a smoother surface. Always sand in the direction of the wood grain to avoid scratches. If repairs are necessary, use suitable wood fillers or epoxy to fill cracks and holes, ensuring a seamless finish. Apply finishes evenly, following the manufacturer’s instructions, and allow sufficient drying time between coats.
Are you looking for a world-class home renovation college?
Contact NATS for more information.
4 Essential Woodworking Techniques for Those in Cabinet Making Training
August 11, 2023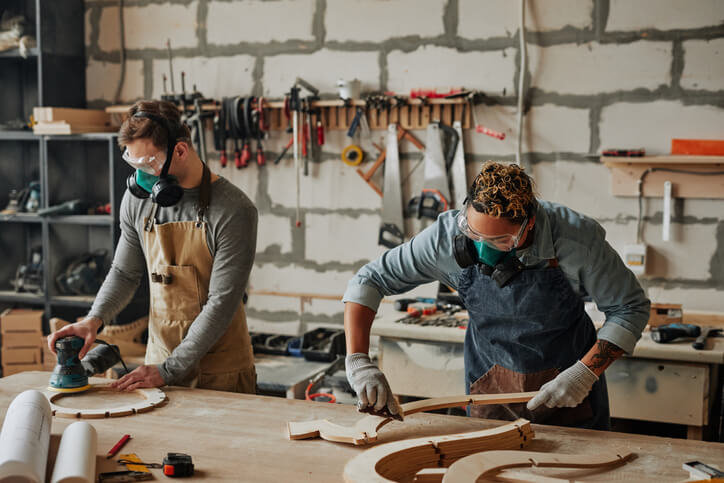
Like many other handcrafts, cabinet-making requires the use of several intricate skills and techniques. The accuracy, precision, and skill that go into it can only be obtained from quality learning and constant practice. This is why we have dedicated and passionate instructors at the North American Trade Schools (NATS) to pass down their wealth of experience to willing learners. If you choose a cabinet making career, you’ll be interested in the woodworking techniques discussed in this article.
Milling After Cabinet Making Training
Milling involves the conversion of rough lumber into symmetrical and precise work pieces, and it’s one of the most useful techniques you’ll learn during cabinet making training. It is the wood preparation process that begins with flattening one face of the board at the jointer and then smoothening the board’s opposite face at the planer. Next, you can make the board’s remaining edge true to the other by using a table saw and a chop saw.
Jointing
Jointing is the process when you smooth one face of the workpiece so you can reference it from that face whileTruing up the workpiece. During your journey through the cabinet making certificate program you will be shown the importance of good jointing techniques.
Planing
Planing is a surface-smoothing technique that rids the wood surface of any defects and excess material. You must learn to use a hand or electric planer to carry it out. When properly done, the lumber board will turn out with an even thickness across its required length. This is after you must have used the jointer to flatten one face of the board.
Sawing
Sawing is unarguably one of the most important parts of cabinet making. Our cabinet making courses provide insights into how to use several sawing tools and the various techniques for handling them. These tools include the chop saw, handsaw, table saw, circular saw, and chainsaw, among other sawing tools used for different purposes and project types. The key to using some of these tools is maintaining the right posture to achieve maximum impact without endangering yourself.
Drilling and Boring
While drilling creates holes in the wood, boring further enlarges the hole by removing excess material along the depth of the opening. Both processes will need precise control of the work tools to create openings with the right fit, and this requires adequate knowledge of the use of the proper drilling and boring tools and their accessories.
While using the drilling press, ensure the drill is at the correct speed, as drilling too fast can break the drill bit and create poorly machined holes. And while drilling in deep cuts, take out the drill at intervals to cool and clean the bit.
Finishing
This is the last stage of the cabinet-making process. It involves a series of actions, including sanding, filing, and rendering, all of which are taken to add finishing touches to the cabinet. For the best results, start with coarse grit sandpaper and sand in the board’s grain direction to create a fine grit surface free of scratches.
Top it off by applying thin coats of the selected finish across the entirety of the cabinet while looking out for joints and other hidden parts. Lightly sand on the cabinet surface before applying the topcoat, if necessary.
Want to earn your cabinet making diploma?
Contact NATS to learn how you can get started.
Cabinet making is fun and rewarding career path that allows you to use plenty of creative licenses. Many exciting decisions exist in this area, from the wood you choose to work with to the style your project emulates.
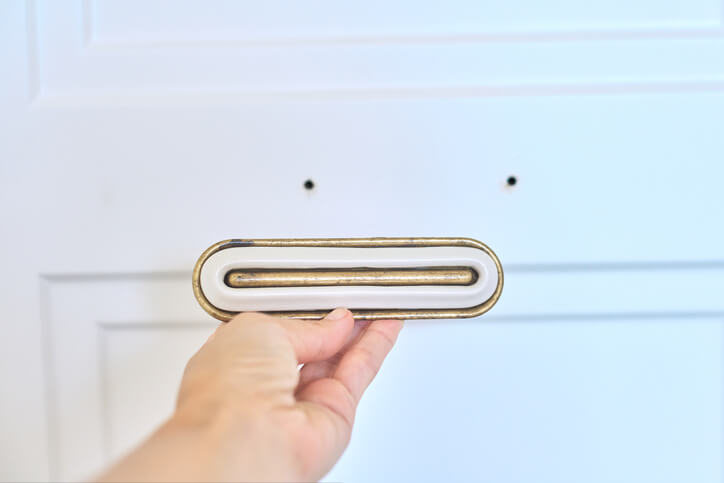
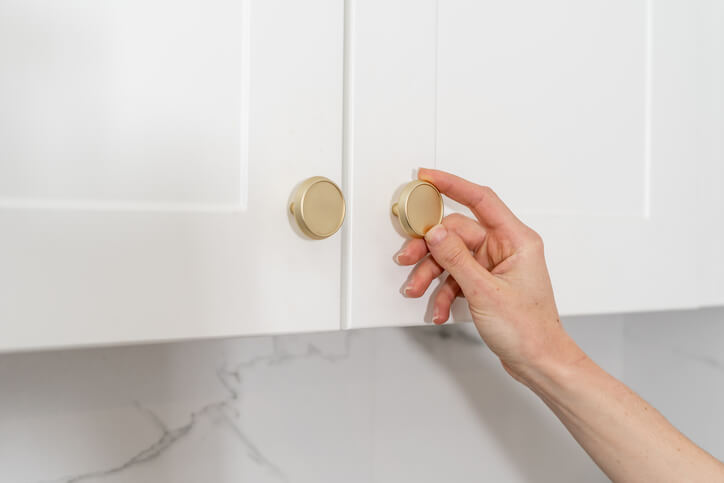
During cabinet making training, you’ll learn about the different types of hardware you can use to add the finishing touches to your cabinets. Handles on cabinet doors are essential, as they contribute to everyday ease of use and present the perfect opportunity to make a significant style statement. Read on to learn what you should consider when choosing hardware for your cabinets once you begin your career.
Know Different Hardware Styles After Cabinet Making Training
During cabinet making training and throughout your career, you’ll see and learn about a vast array of cabinet door handle styles. Knowing the characteristics of each style and what design components complement one another will help you make the right decision for your clients. Most cabinet hardware falls under one of the following style categories:
- Contemporary: Sleek lines, a neutral colour palette, and simplicity are hallmarks of the contemporary style. If you’ve built cabinets for clients wanting a contemporary space, opt for something simple and streamlined. For example, linear bar handles are a trendy contemporary option to create a harmonious effect that your clients are sure to love.
- Traditional: There’s a reason why the traditional style has stood the test of time. The ornate details and curved shapes create a look best described as ‘fancy.’ This hardware style looks best in a space with plenty of opulent details and pays homage to antique decor. Traditional-styled cabinet door handles can be added to a modern space for an eclectic touch.
- Rustic: The ‘farmhouse’ or rustic style has recently gained popularity among clients, particularly in kitchens. Rustic finishes tend to produce a homey look where simplicity is favoured with industrial details. Rustic hardware is simple but balanced, typically combining straight and curved lines.

Remind Clients to Keep Comfort in Mind When it Comes to Cabinet Hardware
Cabinet doors can be closed and opened multiple times throughout the day, depending on their location. After Cabinet Making training, it’s important to remind clients to consider comfort in order to maximize the overall results of the project.
Providing clients with samples of each style are so they may test each handle’s feel and functionality will help them make the right decision. Ask them to pay close attention to how each handle feels in their hands, whether there are any imperfections in the material, and how easy (or difficult) it is to open a door with the handle. Comfort plays a significant role in the overall user experience of cobinet making jobs.
Help Clients Choose the Right Finish After Cabinet Making Training
The finish will likely be the most noticeable characteristic of the hardware your client chooses for their cabinets. While chrome and brushed nickel are some of the more common choices, there are many other options your clients can choose from.
Regarding kitchens and bathrooms, there’s a common belief that the hardware should match the faucet; however, this isn’t necessary. Simply make sure that clients know that the finishes of their hardware should compliment (not necessarily match) other finishes in the space.
Our Cabinet Making diploma program teaches students about the wood selection process, as well as how to read drawings, operate woodworking machines, and practice the arts of cabinet making. Hands-on training is a hallmark of our program, and our students are fully prepared to work on various cabinet making and installation projects with confidence and mastery.
Are you ready to start Cabinet Making courses?
Contact NATS to learn how you can get started.


